| Detailed logging output simplifies the debugging of a typical Java Platform, Enterprise Edition (Java EE) application, for example, a three-tier application that is deployed in an application server and stores data in a relational database management system (RDBMS). By integrating Hibernate 4, Apache Log4j, and GlassFish Server with the Eclipse integrated development environment (IDE) for Java EE developers, you can obtain detailed logging output from an application that you are developing. Hibernate obtains basic SQL logging output. Apache Log4j obtains detailed logging output. The Eclipse IDE displays a concise form of the individual log entries, omitting extraneous information in the raw server.log file. A sample application is provided to demonstrate the logging output that you can obtain by integrating these technologies. Note - Because of class loading limitations with Hibernate, you must use Hibernate 4. This tutorial addresses the following topics:
Suggested AudienceThis tutorial is for software developers who are developing Java EE applications for deployment in GlassFish Server. This tutorial assumes that you are familiar with all the technologies that are used in the tutorial. Downloading, Installing, and Configuring Required SoftwareBefore you begin, download, install, and configure the required software.
Creating a Project in Eclipse IDEBefore you start to develop your application, create a suitable Eclipse IDE project for developing Java EE applications. Setting Up the Database and Data SourceExactly how to set up the database and data source depends on the database that your application uses. For detailed instructions, see Administering Database Connectivity in Oracle GlassFish Server Administration Guide. Specifying Hibernate as the Persistence ProviderBy default, GlassFish Server Open Source Edition uses EclipseLink as the persistence provider. To specify Hibernate as the persistence provider, you must explicitly declare the persistence provider in the persistence.xml file. The persistence.xml file is a descriptor file that defines one or more persistence units in an enterprise application that uses entities. Declare the persistence provider as follows:
The element <property name="hibernate.show-sql" value="true"/> does not affect the SQL logging output. Therefore, you can omit this element. The following example persistence.xml file declares a persistence unit that is named BankServiceCtx for which the persistence provider is org.hibernate.ejb.HibernatePersistence. <persistence xmlns="http://java.sun.com/xml/ns/persistence"
xmlns:xsi="http://www.w3.org/2001/XMLSchema-instance"
xsi:schemaLocation="http://java.sun.com/xml/ns/persistence http://java.sun.com/xml/ns/persistence/persistence_2_0.xsd" version="2.0">
<persistence-unit name="BankServiceCtx" transaction-type="JTA">
<provider>org.hibernate.ejb.HibernatePersistence</provider>
<jta-data-source>jdbc/__default</jta-data-source>
<properties>
<property name="hibernate.dialect" value="org.hibernate.dialect.DerbyDialect"/>
<property name="hibernate.hbm2ddl.auto" value="create"/>
<!-- <property name="hibernate.show-sql" value="true"/> -->
</properties>
</persistence-unit>
</persistence>
Configuring Hibernate to Obtain Basic SQL Logging Output
hibernate.show_sql=true hibernate.format_sql=true Before you begin, ensure that the glassfish3/glassfish/lib folder in your GlassFish Server installation contains the Log4j library file log4j-1.2.x.jar. To obtain detailed SQL logging output for the org.hibernate.ejb.HibernatePersistence persistence provider, configure Log4j to trace all packages whose name starts with org.hibernate:
The complete log4j.properties file is as follows: ### direct log messages to stdout ###
log4j.appender.stdout=org.apache.log4j.ConsoleAppender
log4j.appender.stdout.Target=System.out
log4j.appender.stdout.layout=org.apache.log4j.PatternLayout
log4j.appender.stdout.layout.ConversionPattern=%d{ABSOLUTE} %5p %c{1}:%L - %m%n
### direct messages to file hibernate.log ###
#log4j.appender.file=org.apache.log4j.FileAppender
#log4j.appender.file.File=hibernate.log
#log4j.appender.file.layout=org.apache.log4j.PatternLayout
#log4j.appender.file.layout.ConversionPattern=%d{ABSOLUTE} %5p %c{1}:%L - %m%n
### set log levels - for more verbose logging change 'info' to 'debug' ###
log4j.rootLogger=warn, stdout
#log4j.logger.org.hibernate=info
log4j.logger.org.hibernate=debug
### log HQL query parser activity
#log4j.logger.org.hibernate.hql.ast.AST=debug
### log just the SQL
#log4j.logger.org.hibernate.SQL=debug
### log JDBC bind parameters ###
log4j.logger.org.hibernate.type=info
#log4j.logger.org.hibernate.type=debug
### log schema export/update ###
log4j.logger.org.hibernate.tool.hbm2ddl=debug
### log HQL parse trees
#log4j.logger.org.hibernate.hql=debug
### log cache activity ###
#log4j.logger.org.hibernate.cache=debug
### log transaction activity
#log4j.logger.org.hibernate.transaction=debug
### log JDBC resource acquisition
#log4j.logger.org.hibernate.jdbc=debug
### enable the following line if you want to track down connection ###
### leakages when using DriverManagerConnectionProvider ###
#log4j.logger.org.hibernate.connection.DriverManagerConnectionProvider=trace
Using the Sample ApplicationThe sample application is a three-tier application that stores data that a user enters in persistent storage, namely a database. The web tier consists of a very simple form that invokes a basic servlet to process the data. The web tier accesses only the session beans. Within the enterprise bean tier, the session beans use Java persistence entities. The entities access the database tables that store the entity states. A plain old Java object (POJO) with some annotations specifies how JPA is to store the data persistently. Hibernate 4 complies fully with the JPA 2.0 specification. The EntityManager implementation creates the tables in the database. The application uses the JavaDB database that is bundled with Glassfish Server. You can set up this database by using the the GlassFish Server Administration Console without using the command line. The container controls transactions by using the using the jdbc/__default DataSource object. This object is specified in the jta-data-source element of the persistence.xml file as follows: <jta-data-source>jdbc/__default</jta-data-source> Using the sample application involves the following tasks:
To Convert the Sample Application to an Eclipse IDE ProjectThe sample application is distributed as an enterprise application archive (EAR) file. To use this application, you must convert it to an Eclipse IDE project.
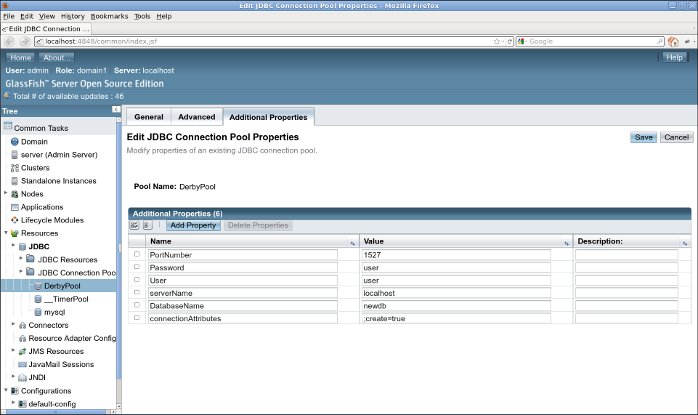
To Modify the DerbyPool Connection PoolThe sample application uses the preconfigured DerbyPool connection pool for connections to the database. To enable the sample application to use this pool, you must modify the preset values of some properties of the pool. Before you begin, ensure that the option to start the Java DB process with GlassFish Server is set in the global preferences for the GlassFish Server.
To Run the Sample Application
Viewing the SQL logging output involves viewing the server.log file in Eclipse IDE.
Further ReadingFor more information about the technologies in this tutorial, see the following documentation:
|