| This page describe the expectations the GlassFish DAS will have on a virtual machine instance template.
- To get instructions to create load-balancer template, refer to LBTemplating.
- Pre-built JeOS images at Ubuntu site are very old. To create JeOS image using vmbuilder, refer to VMBuilder.
1. Get installable image (jeos). 1.1 Ubuntu jeos Download the jeos CD image from
wget http://cdimage.ubuntu.com/cdimage/jeos/releases/8.04.3/release/jeos-8.04.3-jeos-i386.iso
2. Create the virtual machine. 2.1 KVM Virtual Machine installation
- Start the Virtual Machine Manager (Applications->System Tools->Virtual Machine Manager)
- Add a Connection (File->Add Connection) to the Local QEMU/KVM hypervisor
- Right click on localhost(QEMU) node and select "New..."
- Select Name
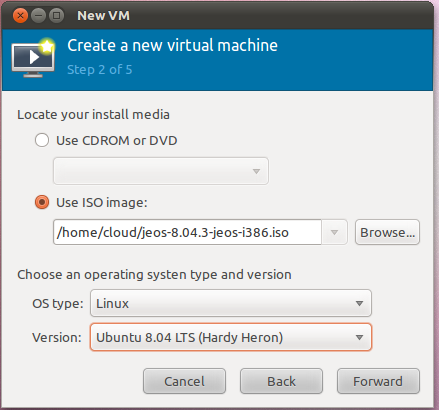
- Select the ISO file you downloaded as well as OS Type.
- Select Memory and Process allocation
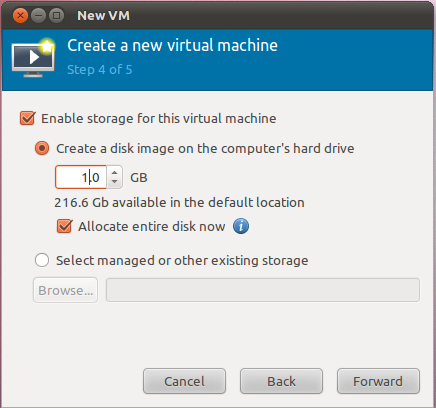
- Create storage for the virtual machine (this is the disk used to install the underlying operating systems). Here I just allocated 1Gb.
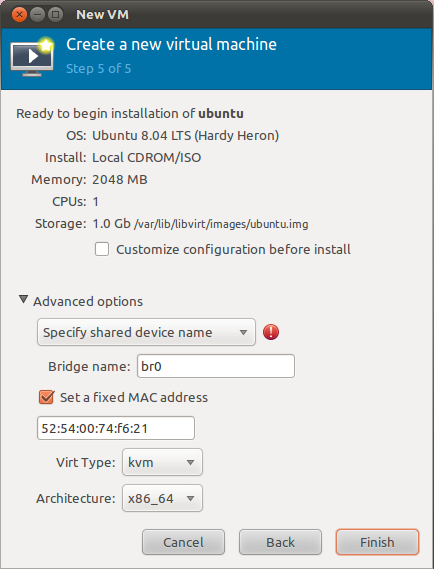
- Select the bridged network interface (br0)
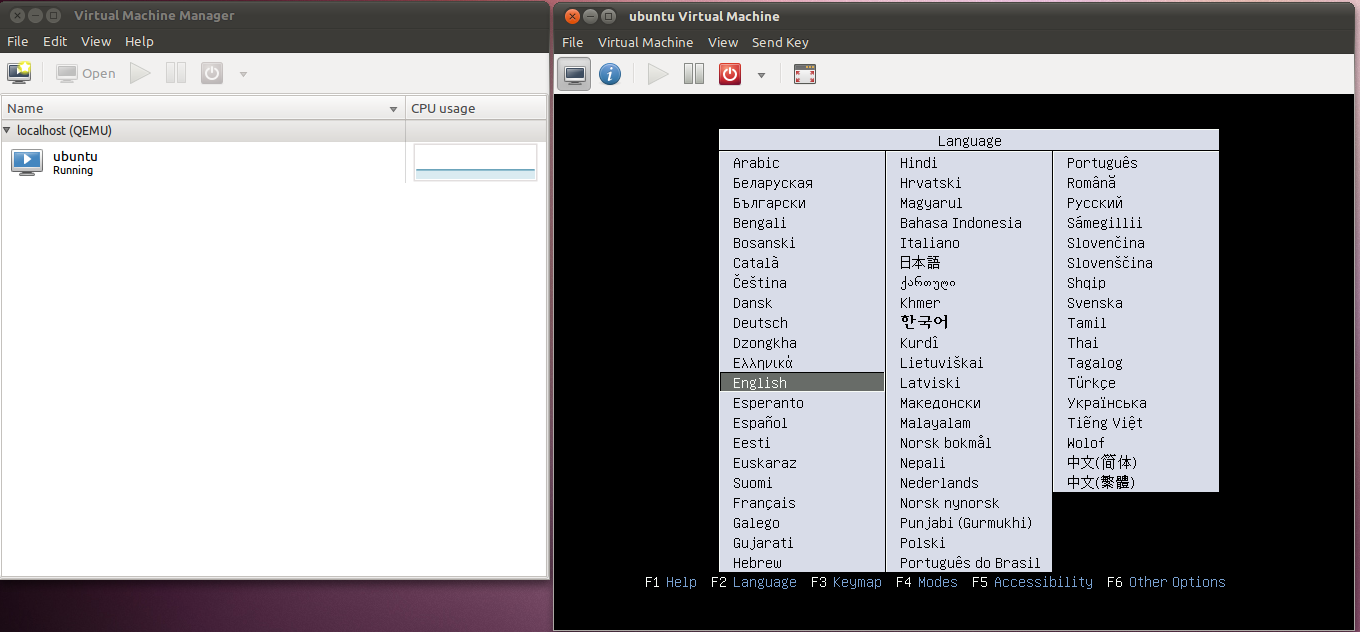
- Now your virtual machine should boot for the first time, install Ubuntu
2.2 Install the operating system. Normal Operating system installation steps within the newly created virtual machine. 3. Customize the image. To customize the image, you can download the customization script from your glassfish DAS instance.
wget http://DAS_IP:8080/ubuntu/configure-master.sh
Run the script (NOT AS ROOT) :
configure-master.sh <DAS_ADDRESS> [DAS_PORT] [DOMAIN]
DAS port and domain are optional.
The script will require that you enter the virtual machine sudo password. Alternatively you can do it by hand following the suggested steps below. 3.1 Update the image
sudo apt-get -y -q update
sudo apt-get -y -q upgrade
sudo apt-get clean
3.2 Install required packages.
sudo apt-get -y -q install wget
sudo apt-get -y -q install sun-java6-jdk
sudo apt-get -y -q install unzip
sudo apt-get -y -q install openssh-server
3.3 Install Glassfish and tools.
echo "Installing GlassFish"
cd /opt
sudo mkdir glassfishvm
sudo chmod a+rwx glassfishvm
cd glassfishvm
wget http://$das_address:$das_port/glassfish.zip
unzip glassfish.zip
rm glassfish.zip
echo "Installing vitualization code"
wget http://$das_address:$das_port/vmcluster.jar
mv vmcluster.jar glassfish3/glassfish/modules
3.4 Install startup script.
echo "Installing GlassFish as a startup service"
cd /etc/init.d
#sudo wget http://$das_address:$das_port/ubuntu/glassfish
sudo wget http://$das_address:$das_port/ubuntu/initial-setup.sh
sudo mv initial-setup.sh glassfish
sudo chmod a+x glassfish
sudo update-rc.d glassfish defaults
4. Template extraction. To register a template in GlassFish, you need 2 files :
*The image file you created above
*The libvirt xml description of the virtual machine (which will be customized at each virtual machine creation). 4.1 Example KVM configuration file. The example below is a KVM virtual machine XML description file :
<domain type='kvm' id='3'>
  <name>ubuntu</name>
  <uuid>15e982eb-f2f5-f91f-bee6-bef448e8a887</uuid>
  <memory>2097152</memory>
  <currentMemory>2097152</currentMemory>
  <vcpu>1</vcpu>
  <os>
    <type arch='x86_64' machine='pc-0.12'>hvm</type>
    <boot dev='hd'/>
  </os>
  <features>
    <acpi/>
    <apic/>
    <pae/>
  </features>
  <clock offset='utc'/>
  <on_poweroff>destroy</on_poweroff>
  <on_reboot>restart</on_reboot>
  <on_crash>restart</on_crash>
  <devices>
    <emulator>/usr/bin/kvm</emulator>
    <disk type='file' device='disk'>
      <driver name='qemu' type='raw'/>
      <source file='/var/lib/libvirt/images/ubuntu.img'/>
      <target dev='hda' bus='ide'/>
      <alias name='ide0-0-0'/>
      <address type='drive' controller='0' bus='0' unit='0'/>
    </disk>
    <disk type='block' device='cdrom'>
      <driver name='qemu' type='raw'/>
      <target dev='hdc' bus='ide'/>
      <readonly/>
      <alias name='ide0-1-0'/>
      <address type='drive' controller='0' bus='1' unit='0'/>
    </disk>
    <controller type='ide' index='0'>
      <alias name='ide0'/>
      <address type='pci' domain='0x0000' bus='0x00' slot='0x01' function='0x1'/>
    </controller>
    <interface type='bridge'>
      <mac address='52:54:00:74:f6:21'/>
      <source bridge='br0'/>
      <target dev='vnet0'/>
      <model type='virtio'/>
      <alias name='net0'/>
      <address type='pci' domain='0x0000' bus='0x00' slot='0x03' function='0x0'/>
    </interface>
    <serial type='pty'>
      <source path='/dev/pts/0'/>
      <target port='0'/>
      <alias name='serial0'/>
    </serial>
    <console type='pty' tty='/dev/pts/0'>
      <source path='/dev/pts/0'/>
      <target type='serial' port='0'/>
      <alias name='serial0'/>
    </console>
    <input type='mouse' bus='ps2'/>
    <graphics type='vnc' port='5900' autoport='yes'/>
    <sound model='ac97'>
      <alias name='sound0'/>
      <address type='pci' domain='0x0000' bus='0x00' slot='0x04' function='0x0'/>
    </sound>
    <video>
      <model type='cirrus' vram='9216' heads='1'/>
      <alias name='video0'/>
      <address type='pci' domain='0x0000' bus='0x00' slot='0x02' function='0x0'/>
    </video>
    <memballoon model='virtio'>
      <alias name='balloon0'/>
      <address type='pci' domain='0x0000' bus='0x00' slot='0x05' function='0x0'/>
    </memballoon>
  </devices>
  <seclabel type='dynamic' model='apparmor'>
    <label>libvirt-15e982eb-f2f5-f91f-bee6-bef448e8a887</label>
    <imagelabel>libvirt-15e982eb-f2f5-f91f-bee6-bef448e8a887</imagelabel>
  </seclabel>
</domain>
4.2 Example Xen configuration file The example below is a Xen virtual machine configuration file
<domain type='xen' id='1'>
  <name>master</name>
  <uuid>91d6bdbb-2f78-d137-abb8-3b58c60494a4</uuid>
  <memory>1048576</memory>
  <currentMemory>524288</currentMemory>
  <vcpu>1</vcpu>
  <os>
    <type>hvm</type>
    <loader>/usr/lib/xen/boot/hvmloader</loader>
    <boot dev='hd'/>
  </os>
  <features>
    <acpi/>
    <apic/>
    <pae/>
  </features>
  <clock offset='utc'/>
  <on_poweroff>destroy</on_poweroff>
  <on_reboot>restart</on_reboot>
  <on_crash>restart</on_crash>
  <devices>
    <emulator>/usr/lib64/xen/bin/qemu-dm</emulator>
    <disk type='file' device='disk'>
      <driver name='file'/>
      <source file='/var/lib/xen/images/master.img'/>
      <target dev='hda' bus='ide'/>
    </disk>
    <disk type='file' device='cdrom'>
      <target dev='hdc' bus='ide'/>
      <readonly/>
    </disk>
    <interface type='bridge'>
      <mac address='00:16:36:3c:2b:82'/>
      <source bridge='xenbr0'/>
      <script path='vif-bridge'/>
      <target dev='vif1.0'/>
    </interface>
    <serial type='pty'>
      <source path='/dev/pts/1'/>
      <target port='0'/>
    </serial>
    <console type='pty' tty='/dev/pts/1'>
      <source path='/dev/pts/1'/>
      <target port='0'/>
    </console>
    <input type='mouse' bus='ps2'/>
    <graphics type='vnc' port='5901' autoport='yes' keymap='en-us'/>
  </devices>
</domain>
4.3 Obtaining a configuration file 4.3.1 Connect to the hypervisor Depending if you are connecting to a local or remote machine, you will need to use the right connection string :
| Hypervisor |
local |
remote |
| KVM |
qemu:///system |
qemu+ssh://user@host/system |
| Xen |
xen:/// |
xen+ssh://user@host |
For complete reference : http://libvirt.org/uri.html Remember that if you connect to a remote machine, you must have installed your SSH public key on that machine. For instance I connect to one of my machine :
virsh -c qemu+ssh://cloud@10.132.181.57/system If your connection is successful, you will get a # prompt 4.3.2 Get the configuration file. Once connected, ensuring your virtual machine is started (let's call it "master"), just do
and it should dump the current virtual machine configuration to the screen, save it to a xml file. 4.4 Registering the template. The template files (.img and .xml) must now be installed in the DAS by issuing an administrative command :
asadmin add-template --location <image_file> --xml <xml_file> --virtName libvirt ubuntu
bug note : you must specify the absolute path to both the image and the xml files. libvirt is to specify that this template is to be used with libvirt virtualization only. 4.5 Template user The template will be used to run an entire operating system in the VM (equivalent to a GlassFish node). The template has been built with a particular user that will run the glassfish instances within that VM. Therefore, user information must be added to the template configuration that will be use by the DAS to ssh into the node. To create the template user information :
sadmin create-template-user --templateName ubuntu --virtName libvirt --userId <unix-user-id> --groupId <unix-group-id> unix-name
|
