src/main/webapp/
    index.xhtml
    return.xhtml
    WEB_INF/
        beans.xml
        web.xml
    flow-a/
        flow-a.xhtml
        next_a1.xhtml
        next_a2.xhtml
    flow-b/
        flow-b-flow.xml
        next_b1.xhtml
        next_b2.xhtml
src/main/java/javaeetutorial/flowexample
            FlowA.java
            Flow_a_Bean.java
Flow_b_Bean.javaUsing Faces Flows
The Faces Flows feature of JavaServer Faces technology allows you to
create a set of pages with a scope, FlowScoped, that is greater than
request scope but less than session scope. For example, you might want
to create a series of pages for the checkout process in an online store.
You could create a set of self-contained pages that could be transferred
from one store to another as needed.
Faces Flows are somewhat analogous to subroutines in procedural programming, in the following ways.
-
Like a subroutine, a flow has a well defined entry point, list of parameters, and return value. However, unlike a subroutine, a flow can return multiple values.
-
Like a subroutine, a flow has a scope, allowing information to be available only during the invocation of the flow. Such information is not available outside the scope of the flow and does not consume any resources once the flow returns.
-
Like a subroutine, a flow may call other flows before returning. The invocation of flows is maintained in a call stack: a new flow causes a push onto the stack, and a return causes a pop.
An application can have any number of flows. Each flow includes a set of pages and, usually, one or more managed beans scoped to that flow. Each flow has a starting point, called a start node, and an exit point, called a return node.
The data in a flow is scoped to that flow alone, but you can pass data from one flow to another by specifying parameters and calling the other flow.
Flows can be nested, so that if you call one flow from another and then exit the second flow, you return to the calling flow rather than to the second flow’s return node.
You can configure a flow programmatically, by creating a class annotated
@FlowDefinition, or you can configure a flow by using a configuration
file. The configuration file can be limited to one flow, or you can use
the faces-config.xml file to put all the flows in one place, if you
have many flows in an application. The programmatic configuration places
the code closer to the rest of the flow code and enables you to
modularize the flows.
Figure 16-1 shows two flows and illustrates how they interact.
Figure 16-1 Two Faces Flows and Their Interactions
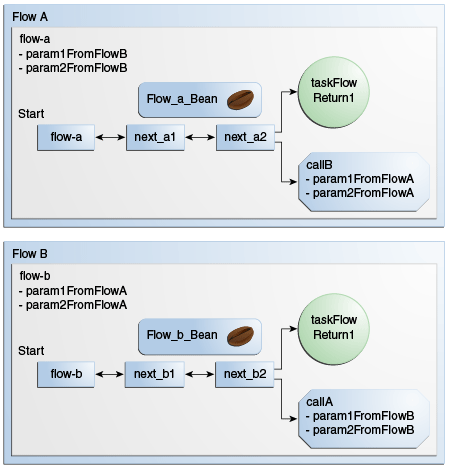
In this figure, Flow A has a start node named flow-a and two
additional pages, next_a1 and next_a2. From next_a2, a user can
either exit the flow using the defined return node, taskFlowReturn1,
or call Flow B, passing two parameters. Flow A also defines two inbound
parameters that it can accept from Flow B. Flow B is identical to Flow A
except for the names of the flow and files. Each flow also has an
associated managed bean; the beans are Flow_a_Bean and Flow_b_Bean.
Packaging Flows in an Application
Typically, you package flows in a web application using a directory
structure that modularizes the flows. In the src/main/webapp directory
of a Maven project, for example, you would place the Facelets files that
are outside the flow at the top level as usual. Then the webapp files
for each flow would be in a separate directory, and the Java files would
be under src/main/java. For example, the files for the application
shown in Figure 16-1 might look like this:
In this example, flow-a is defined programmatically in FlowA.java,
while flow-b is defined by the configuration file flow-b-flow.xml.
The Simplest Possible Flow: The simple-flow Example Application
The simple-flow example application demonstrates the most basic
building blocks of a Faces Flows application and illustrates some of the
conventions that make it easy to get started with iterative development
using flows. You may want to start with a simple example like this one
and build upon it.
This example provides an implicit flow definition by including an empty
configuration file. A configuration file that has content, or a class
annotated @FlowDefinition, provides an explicit flow definition.
The source code for this application is in the tut-install`/examples/web/jsf/simple-flow/` directory.
The file layout of the simple-flow example looks like this:
src/main/webapp
    index.xhtml
    simple-flow-return.xhtml
    WEB_INF/
        web.xml
    simple-flow
        simple-flow-flow.xml
        simple-flow.xhtml
        simple-flow-page2.xhtml
The simple-flow example has an empty configuration file, which is by
convention named flow-name-flow.xml. The flow does not require any
configuration for the following reasons.
-
The flow does not call another flow, nor does it pass parameters to another flow.
-
The flow uses default names for the first page of the flow, flow-name`.xhtml`, and the return page, flow-name`-return.xhtml`.
This example has only four Facelets pages.
-
index.xhtml, the start page, which contains almost nothing but a button that navigates to the first page of the flow:<p><h:commandButton value="Enter Flow" action="simple-flow"/></p> -
simple-flow.xhtmlandsimple-flow-page2.xhtml, the two pages of the flow itself. In the absence of an explicit flow definition, the page whose name is the same as the name of the flow is assumed to be the start node of the flow. In this case, the flow is namedsimple-flow, so the page namedsimple-flow.xhtmlis assumed to be the start node of the flow. The start node is the node navigated to upon entry into the flow. It can be thought of as the home page of the flow.The
simple-flow.xhtmlpage asks you to enter a flow-scoped value and provides a button that navigates to the next page of the flow:<p>Value: <h:inputText id="input" value="#{flowScope.value}" /></p> <p><h:commandButton value="Next" action="simple-flow-page2" /></p>The second page, which can have any name, displays the flow-scoped value and provides a button that navigates to the return page:
<p>Value: #{flowScope.value}</p> <p><h:commandButton value="Return" action="simple-flow-return" /></p> -
simple-flow-return.xhtml, the return page. The return page, which by convention is named flow-name`-return.xhtml`, must be located outside of the flow. This page displays the flow-scoped value, to show that it has no value outside of the flow, and provides a link that navigates to theindex.xhtmlpage:<p>Value (should be empty): "<h:outputText id="output" value="#{flowScope.value}" />"</p> <p><h:link outcome="index" value="Back to Start" /></p>
The Facelets pages use only flow-scoped data, so the example does not need a managed bean.
To Build, Package, and Deploy the simple-flow Example Using NetBeans IDE
-
Make sure that GlassFish Server has been started (see Starting and Stopping GlassFish Server).
-
From the File menu, choose Open Project.
-
In the Open Project dialog box, navigate to:
tut-install/examples/web/jsf -
Select the
simple-flowfolder. -
Click Open Project.
-
In the Projects tab, right-click the
simple-flowproject and select Build.This command builds and packages the application into a WAR file,
simple-flow.war, that is located in thetargetdirectory. It then deploys the application to the server.
To Build, Package, and Deploy the simple-flow Example Using Maven
-
Make sure that GlassFish Server has been started (see Starting and Stopping GlassFish Server).
-
In a terminal window, go to:
tut-install/examples/web/jsf/simple-flow/ -
Enter the following command:
mvn installThis command builds and packages the application into a WAR file,
simple-flow.war, that is located in thetargetdirectory. It then deploys the application to the server.
To Run the simple-flow Example
-
Enter the following URL in your web browser:
http://localhost:8080/simple-flow -
On the
index.xhtmlpage, click Enter Flow. -
On the first page of the flow, enter any string in the Value field, then click Next.
-
On the second page of the flow, you can see the value you entered. Click Return.
-
On the return page, an empty pair of quotation marks encloses the inaccessible value. Click Back to Start to return to the
index.xhtmlpage.
The checkout-module Example Application
The checkout-module example application is considerably more complex
than simple-flow. It shows how you might use the Faces Flows feature
to implement a checkout module for an online store.
Like the hypothetical example in Figure 16-1, the
example application contains two flows, each of which can call the
other. Both flows have explicit flow definitions. One flow,
checkoutFlow, is specified programmatically. The other flow,
joinFlow, is specified in a configuration file.
The source code for this application is in the tut-install`/examples/web/jsf/checkout-module/` directory.
For the checkout-module application, the directory structure is as
follows (there is also a src/main/webapp/resources directory with a
stylesheet and an image):
src/main/webapp/
    index.xhtml
    exithome.xhtml
    WEB_INF/
        beans.xml
        web.xml
    checkoutFlow/
        checkoutFlow.xhtml
        checkoutFlow2.xhtml
        checkoutFlow3.xhtml
        checkoutFlow4.xhtml
    joinFlow/
        joinFlow-flow.xml
        joinFlow.xhtml
        joinFlow2.xhtml
src/main/java/javaeetutorial/checkoutmodule
            CheckoutBean.java
            CheckoutFlow.java
            CheckoutFlowBean.java
            JoinFlowBean.java
For the example, index.xhtml is the beginning page for the application
as well as the return node for the checkout flow. The exithome.xhtml
page is the return node for the join flow.
The configuration file joinFlow-flow.xml defines the join flow, and
the source file CheckoutFlow.java defines the checkout flow.
The checkout flow contains four Facelets pages, whereas the join flow contains two.
The managed beans scoped to each flow are CheckoutFlowBean.java and
JoinFlowBean.java, whereas CheckoutBean.java is the backing bean for
the index.html page.
The Facelets Pages for the checkout-module Example
The starting page for the example, index.xhtml, summarizes the
contents of a hypothetical shopping cart. It allows the user to click
either of two buttons to enter one of the two flows:
<p><h:commandButton value="Check Out" action="checkoutFlow"/></p>
...
<p><h:commandButton value="Join" action="joinFlow"/></p>
This page is also the return node for the checkout flow.
The Facelets page exithome.xhtml is the return node for the join flow.
This page has a button that allows you to return to the index.xhtml
page.
The four Facelets pages within the checkout flow, starting with
checkoutFlow.xhtml and ending with checkoutFlow4.xhtml, allow you to
proceed to the next page or, in some cases, to return from the flow. The
checkoutFlow.xhtml page allows you to access parameters passed from
the join flow through the flow scope. These appear as empty quotation
marks if you have not called the checkout flow from the join flow.
<p>If you called this flow from the Join flow, you can see these parameters:
    "<h:outputText value="#{flowScope.param1Value}"/>" and
    "<h:outputText value="#{flowScope.param2Value}"/>"
</p>
Only checkoutFlow2.xhtml has a button to return to the previous page,
but moving between pages is generally permitted within flows. Here are
the buttons for c`heckoutFlow2.xhtml`:
<p><h:commandButton value="Continue" action="checkoutFlow3"/></p>
<p><h:commandButton value="Go Back" action="checkoutFlow"/></p>
<p><h:commandButton value="Exit Flow" action="returnFromCheckoutFlow"/></p>
The action returnFromCheckoutFlow is defined in the configuration
source code file, CheckoutFlow.java.
The final page of the checkout flow, checkoutFlow4.xhtml, contains a
button that calls the join flow:
<p><h:commandButton value="Join" action="calljoin"/></p>
<p><h:commandButton value="Exit Flow" action="returnFromCheckoutFlow"/></p>
The calljoin action is also defined in the configuration source code
file, CheckoutFlow.java. This action enters the join flow, passing two
parameters from the checkout flow.
The two pages in the join flow, joinFlow.xhtml and joinFlow2.xhtml,
are similar to those in the checkout flow. The second page has a button
to call the checkout flow as well as one to return from the join flow:
<p><h:commandButton value="Check Out" action="callcheckoutFlow"/></p>
<p><h:commandButton value="Exit Flow" action="returnFromJoinFlow"/></p>
For this flow, the actions callcheckoutFlow and returnFromJoinFlow
are defined in the configuration file joinFlow-flow.xml.
Using a Configuration File to Configure a Flow
If you use an application configuration resource file to configure a
flow, it must be named flowName`-flow.xml`. In this example, the join
flow uses a configuration file named joinFlow-flow.xml. The file is a
faces-config file that specifies a flow-definition element. This
element must define the flow name using the id attribute. Under the
flow-definition element, there must be a flow-return element that
specifies the return point for the flow. Any inbound parameters are
specified with inbound-parameter elements. If the flow calls another
flow, the call-flow element must use the flow-reference element to
name the called flow and may use the outbound-parameter element to
specify any outbound parameters.
The configuration file for the join flow looks like this:
<faces-config version="2.2" xmlns="http://xmlns.jcp.org/xml/ns/javaee"
              xmlns:xsi="http://www.w3.org/2001/XMLSchema-instance"
              xsi:schemaLocation="http://xmlns.jcp.org/xml/ns/javaee \
              http://xmlns.jcp.org/xml/ns/javaee/web-facesconfig_2_2.xsd">

    <flow-definition id="joinFlow">
        <flow-return id="returnFromJoinFlow">
            <from-outcome>#{joinFlowBean.returnValue}</from-outcome>
        </flow-return>

        <inbound-parameter>
            <name>param1FromCheckoutFlow</name>
            <value>#{flowScope.param1Value}</value>
        </inbound-parameter>
        <inbound-parameter>
            <name>param2FromCheckoutFlow</name>
            <value>#{flowScope.param2Value}</value>
        </inbound-parameter>

        <flow-call id="callcheckoutFlow">
            <flow-reference>
                <flow-id>checkoutFlow</flow-id>
            </flow-reference>
            <outbound-parameter>
                <name>param1FromJoinFlow</name>
                <value>param1 joinFlow value</value>
            </outbound-parameter>
            <outbound-parameter>
                <name>param2FromJoinFlow</name>
                <value>param2 joinFlow value</value>
            </outbound-parameter>
        </flow-call>
    </flow-definition>
</faces-config>
The id attribute of the flow-definition element defines the name of
the flow as joinFlow. The value of the id attribute of the
flow-return element identifies the name of the return node, and its
value is defined in the from-outcome element as the returnValue
property of the flow-scoped managed bean for the join flow,
JoinFlowBean.
The names and values of the inbound parameters are retrieved from the
flow scope in order (flowScope.param1Value, flowScope.param2Value),
based on the way they were defined in the checkout flow configuration.
The flow-call element defines how the join flow calls the checkout
flow. The id attribute of the element, callcheckoutFlow, defines the
action of calling the flow. Within the flow-call element, the
flow-reference element defines the actual name of the flow to call,
checkoutFlow. The outbound-parameter elements define the parameters
to be passed when checkoutFlow is called. Here they are just arbitrary
strings.
Using a Java Class to Configure a Flow
If you use a Java class to configure a flow, it must have the name of
the flow. The class for the checkout flow is called CheckoutFlow.java.
import java.io.Serializable;
import javax.enterprise.inject.Produces;
import javax.faces.flow.Flow;
import javax.faces.flow.builder.FlowBuilder;
import javax.faces.flow.builder.FlowBuilderParameter;
import javax.faces.flow.builder.FlowDefinition;

class CheckoutFlow implements Serializable {

    private static final long serialVersionUID = 1L;

    @Produces
    @FlowDefinition
    public Flow defineFlow(@FlowBuilderParameter FlowBuilder flowBuilder) {

        String flowId = "checkoutFlow";
        flowBuilder.id("", flowId);
        flowBuilder.viewNode(flowId,
                "/" + flowId + "/" + flowId + ".xhtml").
                markAsStartNode();

        flowBuilder.returnNode("returnFromCheckoutFlow").
                fromOutcome("#{checkoutFlowBean.returnValue}");

        flowBuilder.inboundParameter("param1FromJoinFlow",
                "#{flowScope.param1Value}");
        flowBuilder.inboundParameter("param2FromJoinFlow",
                "#{flowScope.param2Value}");

        flowBuilder.flowCallNode("calljoin").flowReference("", "joinFlow").
                outboundParameter("param1FromCheckoutFlow",
                    "#{checkoutFlowBean.name}").
                outboundParameter("param2FromCheckoutFlow",
                    "#{checkoutFlowBean.city}");
        return flowBuilder.getFlow();
    }
}
The class performs actions that are almost identical to those performed
by the configuration file joinFlow-flow.xml. It contains a single
method, defineFlow, as a producer method with the @FlowDefinition
qualifier that returns a javax.faces.flow.Flow class. The defineFlow
method takes one parameter, a FlowBuilder with the qualifier
@FlowBuilderParameter, which is passed in from the JavaServer Faces
implementation. The method then calls methods from the
javax.faces.flow.Builder.FlowBuilder class to configure the flow.
First, the method defines the flow id as checkoutFlow. Then, it
explicitly defines the start node for the flow. By default, this is the
name of the flow with an .xhtml suffix.
The method then defines the return node similarly to the way the
configuration file does. The returnNode method sets the name of the
return node as returnFromCheckoutFlow, and the chained fromOutcome
method specifies its value as the returnValue property of the
flow-scoped managed bean for the checkout flow, CheckoutFlowBean.
The inboundParameter method sets the names and values of the inbound
parameters from the join flow, which are retrieved from the flow scope
in order (flowScope.param1Value, flowScope.param2Value), based on
the way they were defined in the join flow configuration.
The flowCallNode method defines how the checkout flow calls the join
flow. The argument, calljoin, specifies the action of calling the
flow. The chained flowReference method defines the actual name of the
flow to call, joinFlow, then calls outboundParameter methods to
define the parameters to be passed when joinFlow is called. Here they
are values from the CheckoutFlowBean managed bean.
Finally, the defineFlow method calls the getFlow method and returns
the result.
The Flow-Scoped Managed Beans
Each of the two flows has a managed bean that defines properties for the
pages within the flow. For example, the CheckoutFlowBean defines
properties whose values are entered by the user on both the
checkoutFlow.xhtml page and the checkoutFlow3.xhtml page.
Each managed bean has a getReturnValue method that sets the value of
the return node. For the CheckoutFlowBean, the return node is the
index.xhtml page, specified using implicit navigation:
public String getReturnValue() {
    return "index";
}
For the JoinFlowBean, the return node is the exithome.xhtml page.
To Build, Package, and Deploy the checkout-module Example Using NetBeans IDE
-
Make sure that GlassFish Server has been started (see Starting and Stopping GlassFish Server).
-
From the File menu, choose Open Project.
-
In the Open Project dialog box, navigate to:
tut-install/examples/web/jsf -
Select the
checkout-modulefolder. -
Click Open Project.
-
In the Projects tab, right-click the
checkout-moduleproject and select Build.This command builds and packages the application into a WAR file,
checkout-module.war, that is located in thetargetdirectory. It then deploys the application to the server.
To Build, Package, and Deploy the checkout-module Example Using Maven
-
Make sure that GlassFish Server has been started (see Starting and Stopping GlassFish Server).
-
In a terminal window, go to:
tut-install/examples/web/jsf/checkout-module/ -
Enter the following command:
mvn installThis command builds and packages the application into a WAR file,
checkout-module.war, that is located in thetargetdirectory. It then deploys the application to the server.
To Run the checkout-module Example
-
Enter the following URL in your web browser:
http://localhost:8080/checkout-module -
The
index.xhtmlpage presents hypothetical results of the shopping expedition. Click either Check Out or Join to enter one of the two flows. -
Follow the flow, providing input as needed and choosing whether to continue, go back, or exit the flow.
In the checkout flow, only one of the input fields is validated (the credit card field expects 16 digits), so you can enter any values you like. The join flow does not require you to check any boxes in its checkbox menus.
-
On the last page of a flow, select the option to enter the other flow. This allows you to view the inbound parameters from the previous flow.
-
Because flows are nested, if you click Exit Flow from a called flow, you will return to the first page of the calling flow. (You may see a warning, which you can ignore.) Click Exit Flow on that page to go to the specified return node.
