Table of Contents
The starting point for developing a web service to use WSIT is a
Java class file annotated with the javax.jws.WebService
annotation.
For detailed instructions for how to use NetBeans IDE to create a web service, see Creating a Web Service.
To use the IDE to configure a web service for message optimization, perform the following steps.
To Configure Message Optimization in a Web Service
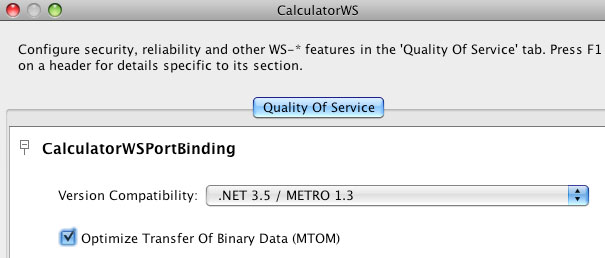
In the IDE Projects window, expand the Web Services node, right-click the CalculatorWSService node, and choose Edit Web Service Attributes.
The Web Service Attributes editor appears.
Select the Optimize Transfer of Binary Data (MTOM) check box, as shown in Enabling MTOM, and click .
This setting configures the web service to optimize messages that it transmits and to decode optimized messages that it receives.
Now that you have configured the web service to use message optimization, you can deploy and test it.
To Deploy and Test a Web Service with Message Optimization Enabled
To deploy and test the web service, perform the following steps.
Right-click the project node and select , then select .
Type
/CalculatorWSService?wsdlin the Relative URL field and click .Right-click the project node and choose .
The IDE starts the web container, builds the application, and displays the WSDL file page in your browser.
The following WSIT tags related to message optimization display in the WSDL file:
Example 8.1.
<ns1:Policy wsu:Id="CalculatorWSPortBindingPolicy"/>
  <ns1:ExactlyOne>
    <ns1:All>
      <ns2:OptimizedMimeSerialization/>
        <ns3:RMAssertion/>
          <ns4:UsingAddressing ns1:Optional="true"/>
    </ns1:All>
  </ns1:ExactlyOne>
</ns1:Policy>
Now that you have built and tested a web service that uses the WSIT Message Optimization technology, you can create a client that accesses and consumes that web service. The client will use the web service's WSDL to create the functionality necessary to satisfy the interoperability requirements of the web service.
To Create a Client to Consume a WSIT-enabled Web Service
To create a client to access and consume the web service, perform the following steps.
Choose → , select Java Web from the Web category and click .
Name the project, for example, CalculatorWSServletClient, and click .
Right-click the CalculatorWSServletClient node and select → .
The New Web Service Client window displays.
Note
NetBeans submenus are dynamic, so the Web Service Client option may not appear. If you do not see the Web Service Client option, select → → → .
Select the WSDL URL option.
Cut and paste the URL of the web service that you want the client to consume into the WSDL URL field.
For example, here is the URL for the
CalculatorWSweb service:When JAX-WS generates the web service, it appends
Serviceto the class name by default.Type
org.me.calculator.clientin the Package field, and click .Right-click the CalculatorWSServletClient project node and choose → .
Name the servlet
ClientServlet, specify the package name, for example,org.me.calculator.clientand click .To make the servlet the entry point to your application, right-click the CalculatorWSServletClient project node, choose , click Run, type
/ClientServletin the Relative URL field, and click .If
ClientServlet.javais not already open in the Source Editor, open it.In the Source Editor, remove the line that comments out the body of the
processRequestmethod.This is the start-comment line that starts the section that comments out the code:
Delete the end-comment line that ends the section of commented out code:
Add some empty lines after the following line:
Right-click in one of the empty lines that you added, then choose → .
The Select Operation to Invoke dialog box appears.
Browse to the Add operation and click .
The
processRequestmethod is as follows, with bold indicating code added by the IDE:Example 8.6.
protected void processRequest(HttpServletRequest request,
                              HttpServletResponse response) throws
        ServletException, IOException {

    response.setContentType("text/html;charset=UTF-8");
    PrintWriter out = response.getWriter();
    out.println("<html>");
    out.println("<head>");
    out.println("<title>Servlet ClientServlet</title>");
    out.println("</head>");
    out.println("<body>");
    out.println("<h1>Servlet ClientServlet at " + request
            .getContextPath() + "</h1>");
    try { // Call Web Service Operation
        org.me.calculator.client.CalculatorWS port = service
                .getCalculatorWSPort();
        // TODO initialize WS operation arguments here
        int i = 0;
        int j = 0;
        // TODO process result here
        int result = port.add(i, j);
        out.println("Result = " + result);
    } catch (Exception ex) {
        // TODO handle custom exceptions here
    }
    out.println("</body>");
    out.println("</html>");
    out.close();
}
Change the values for
int iandint jto other numbers, such as 3 and 4.Add a line that prints out an exception, if an exception is thrown.
The
try/catchblock is as follows (new and changed lines from this step and the previous step are highlighted in bold text):Example 8.7.
try { // Call Web Service Operation
    org.me.calculator.client.CalculatorWS port = service
            .getCalculatorWSPort();
    // TODO initialize WS operation arguments here
    int i = 3;
    int j = 4;
    // TODO process result here
    int result = port.add(i, j);
    out.println("<p>Result: " + result);
} catch (Exception ex) {
    out.println("<p>Exception: " + ex);
}
Save
ClientServlet.java.Right-click the project node and choose .
The server starts (if it was not running already), the application is built, deployed, and run. The browser opens and displays the calculation result.
The Web Services Secure Conversation technology has message optimization benefits. While providing better message-level security it also improves the efficiency of multiple-message exchanges. It accomplishes this by providing basic mechanisms on top of which secure messaging semantics can be defined for multiple-message exchanges. This feature allows for contexts to be established so that potentially more efficient keys or new key material can be exchanged. The result is that the overall performance of subsequent message exchanges is improved.
For more information on how to use Secure Conversation, see Using WSIT Security.