Table of Contents
- 2.1. Metro Tools
- 2.2. Using Mavenized Metro Binaries
- 2.3. Developing with NetBeans
- 2.4. Developing with Eclipse
- 2.5. Logging
- 2.6. Using JAX-WS / Metro with Java SE
- 2.7. Deploying Metro endpoint
- 2.8. Handlers and MessageContext
- 2.9. Deploying Metro with ...
- 2.10. Developing client application with locally packaged WSDL
- 2.11. How to invoke and endpoint by overriding endpoint address in the WSDL
- 2.12. Maintaining State in Web Services
- 2.13. FastInfoset
- 2.14. High Availability Support in Metro
Metro provides these tools to help develop Web services applications:
Note that these tools are located in the
webservices-tools.jar file in the lib/
subdirectory of Metro (standalone)
download. In GlassFish these tools are located in the
webservices-osgi.jar under glassfish/modules
subdirectory. Shell script versions that of the tools are located
under glassfish/bin.
Over the years, the Metro team has found the following tools to be useful for our users when working with web services.
Initially, all Metro releases were built using Ant-based infrastructure. As usual, this approach had some advantages as well as some disadvantages. Perhaps the main disadvantage was that it was difficult to manage the set of all the Metro dependencies. As a result, we were not able to provide first class support for our Maven-based users.
This has changed with Metro 2.1 release.
Metro 2.1 has brought a significant change to the Metro build process
as one of the major tasks in the release was to switch Metro build
system from Ant to Maven. The main Metro build as well as the whole
WSIT project modules
have been fully mavenized and currently Metro is built, assembled and
installed using Maven. Metro releases are deployed to Maven central.
The Metro modules share a new common root
groupId with a value of org.glassfish.metro
and can be browsed at the following location: http://search.maven.org/#search%7Cga%7C1%7Corg.glassfish.metro.
All Metro binaries, sources as well as javadoc and samples are all
available in the maven repository.
If you want to use Metro in a Maven project, you need to declare a dependency on the Metro runtime bundle:
Example 2.1. Declaring Metro non-OSGi dependencies
<project>
    ...
    <dependencies>
        ...
        <dependency>
            <groupId>org.glassfish.metro</groupId>
            <artifactId>webservices-rt</artifactId>
            <version>2.3</version>
        </dependency>
        ...
    </dependencies>
    ...
</project>
Specifying this dependency, Maven resolves all the
transitive dependencies and gets all the jars that
webservices-rt module depends on. Should you want to
use OSGi-fied Metro bundle, you need to declare the following
dependency instead:
Example 2.2. Declaring Metro OSGi dependencies
<project>
    ...
    <dependencies>
        ...
        <dependency>
            <groupId>org.glassfish.metro</groupId>
            <artifactId>webservices-osgi</artifactId>
            <version>2.3</version>
        </dependency>
        ...
    </dependencies>
    ...
</project>Metro has Maven plugins for standard JAX-WS WSImport and WSGen tools and this snippet from pom.xml shows the usage of these maven plugins. More information on using these plugins is available at JAX-WS Maven Plugin Project site.
Even though Metro is currently Maven-based and fully
available from a Maven repository, you can, of course, still use
it in a non-Maven project or install it manually to your
container. First, you need to go to the Metro
Standalone Bundle root in the Maven repository and download
and unzip a version of your choice. For further instructions, please
consult the readme.html file available under the
unzipped metro root directory.
Before you create the web service, make sure GlassFish has been registered with the NetBeans IDE. The registered server list can be viewed from the → menu item.
If necessary, to register GlassFish with the IDE:
Start the IDE. Choose → from the main menu.
The Servers window appears.
Click .
Select GlassFish V2 or V3 or Sun Java System Application Server, and click .
The platform folder location window displays.
Specify the platform location of the server instance and the domain to which you want to register, then click Next.
The Servers window displays.
If requested, type the admin username and password that you supplied when you installed the web container (the defaults are
adminandadminadmin), then click Finish.
The starting point for developing a web service with Metro
is a Java class file annotated with the
javax.jws.WebService annotation. The
WebService annotation defines the class as a web
service endpoint. The following Java code shows a web service. The
IDE will create most of this Java code for you.
Example 2.3.
package org.me.calculator;

import javax.jws.WebService;
import javax.jws.WebMethod;
import javax.jws.WebParam;

@WebService()
public class Calculator {
    @WebMethod(action="sample_operation")
    public String operation(@WebParam(name="param_name")
            String param) {
        // implement the web service operation here
        return param;
    }

    @WebMethod(action="add")
    public int add(@WebParam(name = "i") int i,
           @WebParam(name = "j") int j) {
        int k = i + j;
        return k;
    }
}
Notice that this web service performs a very simple operation. It takes two integers, adds them, and returns the result.
To Create the Web Service
Perform the following steps to use the IDE to create this web service.
Click the Services tab in the left pane, expand the Servers node, and verify that GlassFish is listed in the left pane. If it is not listed, register it by following the steps in Registering GlassFish with the IDE.
Choose → , select Java Web from Category, select Web Application from Projects, and click .
Assign the project a name that is representative of services that will be provided by the web service (for example, CalculatorApplication), set the Project Location to the location where you'd like to create the project, and click . Verify that GlassFish V2 or V3 is the Server and that Java EE Version is Java EE 5 or above. Click .
Note
When you create the web service project, be sure to define a Project Location that does not include spaces in the directory name. Spaces in the directory might cause the web service and web service clients to fail to build and deploy properly. To avoid this problem, Sun recommends that you create a directory, for example
C:\work, and put your project there.Right-click the CalculatorApplication node and choose → .
Type the web service name (
CalculatorWS) and the package name (org.me.calculator) in the Web Service Name and the Package fields respectively.Select and click .
The IDE then creates a skeleton
CalculatorWS.javafile for the web service. This file displays in Source mode in the right pane.In the Operations box of the Design view of CalculatorWS.java, click .
In the upper part of the Add Operation dialog box, type
addin Name.Type
intinto the Return Type field.In the Return Type field, you can either enter a primitive data type or select to select a complex data type.
In the lower part of the Add Operation dialog box, click and create a parameter named
iof typeint. Click again and create a parameter namedjof typeint.Click OK at the bottom of the Add Operation dialog box.
Notice that the
addmethod has been added in the Operations design box.Click the Source tab for CalculatorWS.java in the right pane. Notice that the
addmethod has been added to the source code.Example 2.4.
@WebMethod(operationName="add")
public int add(@WebParam(name = "i") int i, @WebParam(name = "j") int j) {
    // TODO write your implementation code here
    return 0;
}
Change the
addmethod to the following :Example 2.5.
@WebMethod(operationName="add")
public int add(@WebParam(name = "i") int i, @WebParam(name = "j") int j) {
    int k = i + j;
    return k;
}
Save the
CalculatorWS.javafile.
Now that you have coded a web service, you can configure the web service to use Metro's WSIT technologies.
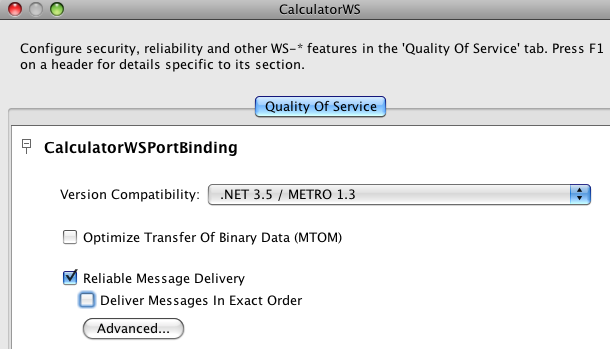
You have a possibility to choose which .NET / METRO version you want your service to be compatible with. There are two choices:
.NET 3.5 / METRO 1.3
.NET 3.0 / METRO 1.0
Choose the version appropriate for your web service development (Note the Metro 2.0 library provided by the latest NetBeans and GlassFish products support either version.) .NET 3.5 / METRO 1.3 is selected by default. There are several differences in between the two versions. For .NET 3.0 / METRO 1.0 documentation please follow this link: Metro 1.0 documentation.
This section describes just how to configure the Reliable Messaging. For a discussion of reliable messaging, see Using Reliable Messaging. To see how to secure the web service, see Using WSIT Security.
To Configure Metro's WSIT Features in the Web Service
To configure a web service to use Reliable Messaging, perform the following steps:
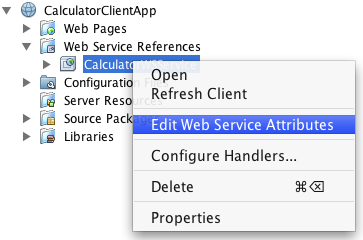
In the Projects window, expand the Web Services node under the CalculatorApplication node, right-click the CalculatorWSService node, and choose , as shown in Editing Web Service Attributes.
Select the Reliable Message Delivery check box, as shown in Reliable Messaging Configuration Window, and click .
This setting ensures that the service sends an acknowledgement to the clients for each message that is delivered, thus enabling clients to recognize message delivery failures and to retransmit the message. This capability makes the web service a "reliable" web service.
In the left pane, expand the Web Pages node and the WEB-INF node, and double-click the
wsit-endpoint-classname.xml(wsit-org.me.calculator.CalculatorWS.xml) file to view this file. Click the Source tab.The following tags enable reliable messaging:
<wsp:Policy wsu:Id="CalculatorWSPortBindingPolicy">
    <wsp:ExactlyOne>
        <wsp:All>
            <wsam:Addressing wsp:Optional="false"/>
            <wsrm:RMAssertion/>
        </wsp:All>
    </wsp:ExactlyOne>
</wsp:Policy>
Now that you have configured the web service to use Metro's WSIT technologies, you can deploy and test it.
To Deploy and Test a Web Service
Right-click CalculatorApplication in the Project node, and select , then select Run.
Type
/CalculatorWSService?wsdlin the Relative URL field and click .Right-click the Project node and choose . The first time GlassFish is started, you will be prompted for the admin password.
The IDE starts the web container, builds the application, and displays the WSDL file page in your browser. You have now successfully deployed a Metro-based web service.
Now that you have built and tested a web service that uses Metro's WSIT technologies, you can create a client that accesses and consumes that web service. The client will use the web service's WSDL to create the functionality necessary to satisfy the interoperability requirements of the web service.
To Create a Client to Consume a WSIT-Enabled Web Service
To create a client to access and consume the web service, perform the following steps.
Choose → , select Web Application from the Java Web category and click .
Name the project, for example, CalculatorWSServletClient, and click .
Verify that GlassFish V2 or V3 is the Server and that Java EE Version is Java EE 5 or above. Click .
Right-click the CalculatorWSServletClient node and select → .
The → window displays.
Note
NetBeans submenus are dynamic, so the Web Service Client option may not appear. If you do not see the Web Service Client option, select → → → .
Select the WSDL URL option.
Cut and paste the URL of the web service that you want the client to consume into the WSDL URL field.
For example, here is the URL for the
CalculatorWSweb service:When JAX-WS generates the web service, it appends
Serviceto the class name by default.Click .
Right-click the CalculatorWSServletClient project node and choose → .
Name the servlet
ClientServlet, specify the package name, for example,org.me.calculator.clientand click Finish.To make the servlet the entry point to your application, right-click the CalculatorWSServletClient project node, choose , click Run, type
/ClientServletin the Relative URL field, and click .If
ClientServlet.javais not already open in the Source Editor, open it.In the Source Editor, remove the line that comments out the body of the
processRequestmethod.This is the start-comment line that starts the section that comments out the code:
Delete the end-comment line that ends the section of commented out code:
Add some empty lines after the following line:
Right-click in one of the empty lines that you added, then choose action and select . Note that for older NetBeans releases, this action was present under " → ".
Then Select Operation to Invoke dialog box appears.
Browse to the Add operation and click .
The
processRequestmethod is as follows, with bold indicating code added by the IDE:Example 2.10.
protected void processRequest(HttpServletRequest request,
        HttpServletResponse response)
        throws ServletException, IOException {
    response.setContentType("text/html;charset=UTF-8");
    PrintWriter out = response.getWriter();
    out.println("<html>");
    out.println("<head>");
    out.println("<title>Servlet ClientServlet</title>");
    out.println("</head>");
    out.println("<body>");
    out.println("<h1>Servlet ClientServlet at " + request
            .getContextPath() + "</h1>");
    try { // Call Web Service Operation
        org.me.calculator.client.CalculatorWS port = service
                .getCalculatorWSPort();
        // TODO initialize WS operation arguments here
        int i = 0;
        int j = 0;
        // TODO process result here
        int result = port.add(i, j);
        out.println("Result = " + result);
    } catch (Exception ex) {
        // TODO handle custom exceptions here
    }
    out.println("</body>");
    out.println("</html>");
    out.close();
}
Change the values for
int iandint jto other numbers, such as 3 and 4.Add a line that prints out an exception, if an exception is thrown.
The
try/catchblock is as follows (new and changed lines from this step and the previous step are highlighted in bold text):Example 2.11.
try { // Call Web Service Operation
    org.me.calculator.client.CalculatorWS port =
            service.getCalculatorWSPort();
    // TODO initialize WS operation arguments here
    int i = 3;
    int j = 4;
    // TODO process result here
    int result = port.add(i, j);
    out.println("<p>Result: " + result);
} catch (Exception ex) {
    out.println("<p>Exception: " + ex);
}
If Reliable Messaging is enabled, the client needs to close the port when done or the server log will be overwhelmed with messages. To close the port, first add the following line to the import statements at the top of the file:
Then add the line in bold at the end of the
tryblock, as shown below.Example 2.13.
try { // Call Web Service Operation
    org.me.calculator.client.CalculatorWS port =
            service.getCalculatorWSPort();
    // TODO initialize WS operation arguments here
    int i = 3;
    int j = 4;
    // TODO process result here
    int result = port.add(i, j);
    out.println("<p>Result: " + result);
    ((Closeable)port).close();
} catch (Exception ex) {
    out.println("<p>Exception: " + ex);
}
Save
ClientServlet.java.Right-click the project node and choose .
The server starts (if it was not running already), the application is built, deployed, and run. The browser opens and displays the calculation result.
Note
For NetBeans 6.x and GlassFish v3, if you are getting GlassFish errors with a "
java.lang.IllegalStateException: Servlet
                            [CompletionInitiatorPortTypeImpl] and Servlet
                            [ParticipantPortTypeImpl] have the same url
                            pattern
" message, make sure the Metro 2.0 JARs were excluded from the client servlet WAR file as explained in Step 19.
This document describes developing Metro WebServices on Eclipse. The instructions below are for Eclipse for JavaEE
This is one time setup.
To setup the environment in Eclipse
After starting Eclipse, select the J2EE perspective: → → →
In the lower window you should see a tab with label Servers. Select the tab and right click in the window and select → .
To download the GlassFish server, select Download additional server adapters. Accept the license and wait for Eclipse to restart.
After Eclipse has restarted, you can create a new GlassFish V2 Java EE5 server.
In the creation dialog select Installed Runtimes and select the directory where your GlassFish installation resides.
To create a Metro Web Services Endpoint
To create the HelloWorld service, create a new dynamic Web project. Give it a name (e.g. helloworld) and select as target runtime GlassFish
Example 2.14. HelloWorld.java
package sample;

import javax.jws.WebService;

@WebService
public class HelloWorld {
    public String hello(String param){
    return param + ", World";
    }
}
Deploy the service by selecting the project and select → .
Check in the server Window that the helloworld project has a status of Synchronized. If this is not the case, right-click in the server window and select publish.
You can check that the GlassFish server is started and contains the Web service by going to the GlassFish admin console (localhost:4848)
See Arun's screen cast, it talks about the above steps.
To create a Web Service Client using Wsimport CLI
Create a new project for the HelloWorld client (an ordinary Java project suffices).
Select Add Glassfish v2 as Server Runtime in Build Path.
Open a command window and go into the source directory of that project in Eclipse. For example, if the Eclipse workspace is in path
and the name of the project is HelloWorldClient, then you need to go to
In this directory execute
On Linux or with Cygwin on Windows, you need to escape the ? by using \? instead.Select refresh in the project view to see the generated files.
Now you can create the client class HelloWorldClient
You can execute the client, by selecting the HelloWorldClient in the package explorer of Eclipse and selecting → . In the console window of Eclipse, you should see "Hello World".
You can pretty much avoid steps 3 - 5 above by using an Ant build.xml file.
To create Web Service Client using Wsimport Ant Task
Select helloworldclient in Package Exp and create a new file build.xml
In this file (build.xml) copy the sample ant build script
Then select build.xml in the package explorer, then right click →
Invoke client target, it will run wsimport ant task and generate the client side stubs
Invoke run to invoke the endpoint and run the client or you can execute the client, by selecting the HelloWorldClient in the package explorer of Eclipse and selecting → . In the console window of Eclipse, you should see "Hello World".
To create Web Service Client using SOAP UI Plugin
Inside Eclipse, install SOAP UI Plugin
Select → →
Press the button and add http://www.soapui.org/eclipse/update/site.xml as the plugin URL
Select and the follow the dialogs to install the soapUI feature
Create a new project for the HelloWorld client (an ordinary Java project suffices).
Select Add Glassfish v2 as Server Runtime in Build Path.
right click BuildPath+Add Library+ServerRuntime+Glassfish v2
Select the project and right click → , SOAP UI WebService item will be added in Project Explorer
Select HelloWorldPortBinding and right click →
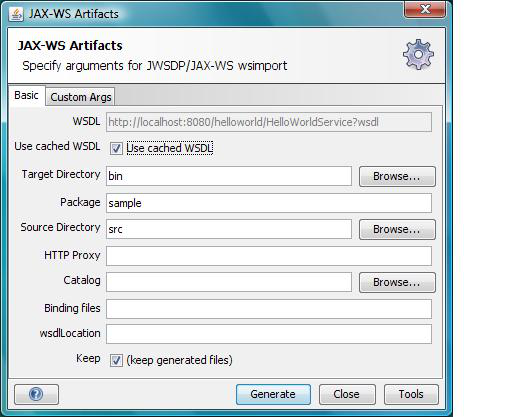
Enter the appropriate info in the JAX-WS Artifacts window
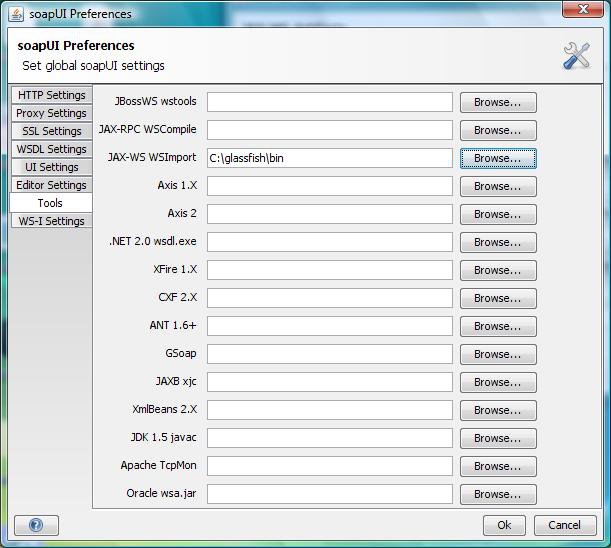
Click Tools and enter the location of JAX-WS Wsimport, for example
c:\glassfish\binClick OK
Then click Generate on JAX-WS Artifacts window, it will display a dialog box that the operation was successful. Switch back to Java Perspective, then refresh the src folder and you can see the wsimport generated classes
Now implement your client code
Example 2.18. HelloWorldClient.java
package sample;

public class HelloWorldClient {

   /**
    * @param args
    */
    public static void main(String[] args) {
        //Create Service
        HelloWorldService service = new HelloWorldService();

        //create proxy
        HelloWorld proxy = service.getHelloWorldPort();

        //invoke
        System.out.println(proxy.hello("hello"));
    }
}
You can execute the client by selecting the HelloWorldClient in the package explorer of Eclipse and selecting → . In the console window of Eclipse, you should see "Hello World".
You can also use Wsimport and Wsgen Maven2 tools. For details see here. Netbeans offers an easy to use a comprehensive Metro tooling choice. On Eclipse you can use SOAP UI or ant build script or CLI or even Maven based tools, which does not look bad. There is RFE on Eclipse and looks like it is being looked at. For the Quality Of Service features (WS-* features) it is little difficult as manually creating/modifying WSIT configuration is hard, so we will need an equivalent of the WSIT Plugin in NetBeans for Eclipse. Please let us know if you are willing to write a WSIT plugin for Eclipse.
As you may know, Metro creates a tubeline for each WS endpoint and endoint client to process SOAP messages flowing from and to the endpoint and or its client. Each tubeline consist of a set of tube instances chained together. A tube is a basic SOAP message processing unit. Standard Metro tubes are used to implement processing logic for different SOAP processing aspects (validation, Java-XML mapping etc.) and higher-level QoS domains (security, reliable messaging etc.) As an experimental feature, custom tubes are supported as well.
When developing an advanced web service that requires Quality of Service features or adding a custom tube into the default Metro tubeline, the ability to see the SOAP message content at different processing stages as the message flows through the tubeline may be very useful. As Metro tubeline get's dynamically created for each endpoint or client, Metro (since version 2.0) provides a new message logging facility that copes with the dynamics of a tubeline creation by defining a set of templating rules that provide a generic way for constructing system-level properties able to control message content logging before and/or after each tube's processing.
To turn on the logging for any particular tube (or a set of tubes) created by a specific tube factory, the developer needs to set one or more of the following system properties, depending on the target scope:
<tube_factory_class_name>.dump- expects boolean string, if set totrueturns on the logging before and after tube's processing<tube_factory_class_name>.dump.before- expects boolean string, if set totrueturns on the logging before tube's processingoverrides anything set by
<tube_factory_class_name>.dump
<tube_factory_class_name>.dump.after- expects boolean string, if set totrueturns on the logging after tube's processingoverrides anything set by
<tube_factory_class_name>.dump
<tube_factory_class_name>.dump.level- expects string representingjava.util.logging.Level, if set, overrides the default message dumping level for the class, which isjava.util.logging.Level.INFO
There is a set of common system properties that control logging for all tubes and take the lowest precedence so that they can be overriden by a tube-specific properties:
com.sun.metro.soap.dump- expects a boolean string, if set totrueturns on the message dumping before and after each tube's processing on both sides client and endpointcom.sun.metro.soap.dump.before/after- expects a boolean string, if set totrueturns on the message dumping before/after each tube's processing on both sides client and endpoint.com.sun.metro.soap.dump.client/endpoint- expects a boolean string, if set totrueturns on the message dumping before and after each tube's processing on the respective side (client or endpoint).com.sun.metro.soap.dump.client/endpoint.before/after- expects a boolean string, if set totrueturns on the message dumping before/after each tube's processing on the respective side (client or endpoint).com.sun.metro.soap.dump.levelandcom.sun.metro.soap.dump.client/endpoint.level- controls the logging level for the whole tubeline
The logger root used for message dumping is
<tube_factory_class_name>.
Most of the factories create tubes on both client and endpoint side. To narrow down the message dumping scope, following system properties can be used:
<tube_factory_class_name>.dump.client/endpoint- expects boolean string, if set totrueturns on the logging before and after tube's processingoverrides anything set by
<tube_factory_class_name>.dump
<tube_factory_class_name>.dump.client/endpoint.before- expects boolean string, if set totrueturns on the logging before tube's processingoverrides anything set by
<tube_factory_class_name>.dumpand/or<tube_factory_class_name>.dump.client/endpoint
<tube_factory_class_name>.dump.client/endpoint.after- expects boolean string, if set totrueturns on the logging after tube's processingoverrides anything set by
<tube_factory_class_name>.dumpand/or<tube_factory_class_name>.dump.client/endpoint
<tube_factory_class_name>.dump.client/endpoint.level- expects string representingjava.util.logging.Level, if set, overrides anything set by<tube_factory_class_name>.leveland or the default message dumping level for the class, which isjava.util.logging.Level.INFO
In the following examples we will be working with the
metro-default.xml file that defines the default
Metro tubeline and looks like this:
Example 2.19.
<metro xmlns:xsi='http://www.w3.org/2001/XMLSchema-instance'
       xmlns='http://java.sun.com/xml/ns/metro/config'
       version="1.0">
   <tubelines default="#default-metro-tubeline">
      <tubeline name="default-metro-tubeline">
         <client-side>
            <tube-factory
                    className="com.sun.xml.ws.assembler.jaxws.TerminalTubeFactory"/>
            <tube-factory
                    className="com.sun.xml.ws.assembler.jaxws.HandlerTubeFactory"/>
            <tube-factory
                    className="com.sun.xml.ws.assembler.jaxws.ValidationTubeFactory"/>
            <tube-factory
                    className="com.sun.xml.ws.assembler.jaxws.MustUnderstandTubeFactory"/>
            <tube-factory
                    className="com.sun.xml.ws.assembler.jaxws.MonitoringTubeFactory"/>
            <tube-factory
                    className="com.sun.xml.ws.assembler.jaxws.AddressingTubeFactory"/>
            <tube-factory
                    className="com.sun.xml.ws.tx.runtime.TxTubeFactory"/>
            <tube-factory
                    className="com.sun.xml.ws.rx.rm.runtime.RmTubeFactory"/>
            <tube-factory
                    className="com.sun.xml.ws.rx.mc.runtime.McTubeFactory"/>
            <tube-factory
                    className="com.sun.xml.wss.provider.wsit.SecurityTubeFactory"/>
            <tube-factory
                    className="com.sun.xml.ws.dump.ActionDumpTubeFactory"/>
            <tube-factory
                    className="com.sun.xml.ws.rx.testing.PacketFilteringTubeFactory"/>
            <tube-factory
                    className="com.sun.xml.ws.dump.MessageDumpingTubeFactory"/>
            <tube-factory
                    className="com.sun.xml.ws.assembler.jaxws.TransportTubeFactory"/>
         </client-side>
         <endpoint-side>
            <tube-factory
                    className="com.sun.xml.ws.assembler.jaxws.TransportTubeFactory"/>
            <tube-factory
                    className="com.sun.xml.ws.dump.MessageDumpingTubeFactory"/>
            <tube-factory
                    className="com.sun.xml.ws.rx.testing.PacketFilteringTubeFactory"/>
            <tube-factory
                    className="com.sun.xml.ws.dump.ActionDumpTubeFactory"/>
            <tube-factory
                    className="com.sun.xml.wss.provider.wsit.SecurityTubeFactory"/>
            <tube-factory
                    className="com.sun.xml.ws.rx.mc.runtime.McTubeFactory"/>
            <tube-factory
                    className="com.sun.xml.ws.assembler.jaxws.AddressingTubeFactory"/>
            <tube-factory
                    className="com.sun.xml.ws.rx.rm.runtime.RmTubeFactory"/>
            <tube-factory
                    className="com.sun.xml.ws.tx.runtime.TxTubeFactory"/>
            <tube-factory
                    className="com.sun.xml.ws.assembler.jaxws.MonitoringTubeFactory"/>
            <tube-factory
                    className="com.sun.xml.ws.assembler.jaxws.MustUnderstandTubeFactory"/>
            <tube-factory
                    className="com.sun.xml.ws.assembler.jaxws.HandlerTubeFactory"/>
            <tube-factory
                    className="com.sun.xml.ws.assembler.jaxws.ValidationTubeFactory"/>
            <tube-factory
                    className="com.sun.xml.ws.assembler.jaxws.TerminalTubeFactory"/>
         </endpoint-side>
      </tubeline>
   </tubelines>
</metro>
Example 1
To turn on the the message dumping before and after security tube's processing on both, client and endpoint side, following system property needs to be set to true:
com.sun.xml.wss.provider.wsit.SecurityTubeFactory.dump=true
com.sun.xml.wss.provider.wsit.SecurityTubeFactory.dump=true
Example 2
To turn on the the message dumping only after security tube's processing on both, client and server side, following system property needs to be set to true:
com.sun.xml.wss.provider.wsit.SecurityTubeFactory.dump.after=true
com.sun.xml.wss.provider.wsit.SecurityTubeFactory.dump.after=true
Example 3
To turn on the the message dumping only after security tube's processing only on the client side, following system property needs to be set to true:
com.sun.xml.wss.provider.wsit.SecurityTubeFactory.dump.client.after=true
com.sun.xml.wss.provider.wsit.SecurityTubeFactory.dump.client.after=true
Example 4
This example sets message dumping before and after
security processing, except for before security processing on
the endpoint side. The logging level for message dumps is set
to FINE on both sides:
com.sun.xml.wss.provider.wsit.SecurityTubeFactory.dump=true
com.sun.xml.wss.provider.wsit.SecurityTubeFactory.dump.endpoint.before=false
com.sun.xml.wss.provider.wsit.SecurityTubeFactory.dump.level=FINE
One of the things people want to do while developing Web
Services is to look at what the client is sending and
receiving. To monitor soap traffic, there are some GUI tools
like TCP
Monitor and WSMonitor.
These monitors are implemented with a 'man in the middle'
approach where-in, the monitor listens to a port (Client send
requests to this port) and forwards it to another port (Server
listens to this port). Since these tools use port forwarding,
you need to change your Web Service client to send request to
the port where the monitor listens (Especially, if you are
using static clients generated by wsimport, the default
endpoint address taken from the wsdl needs to be overidden by
setting ENDPOINT_ADDRESS_PROPERTY on the
proxy).
In JAX-WS, you can monitor the request and response messages without changing the client. When you invoke the Web Service, just pass the system property com.sun.xml.ws.transport.http.client.HttpTransportPipe.dump=true, it prints out the request and response message.
If you are using an Apache Ant script to run your
client, this system property can be set as a
<jvmarg/> element:
Example 2.20. Setting system properties via Ant
<project name="metro client" basedir=".">
   <property environment="env"/>
   <property name="build.dir" location="$${basedir}/build"/>
   <property name="build.classes.dir" location="$${build.dir}/classes"/>

   <target name="run">
      <java classname="client.MyClient" fork="yes">
         <arg value="xxx"/>
         <!-- optional args[0] sent to MyClient.main() -->
         <arg value="xxx"/>
         <!-- optional args[1], etc. -->
         <classpath>
            <pathelement location="$${build.classes.dir}"/>
            <pathelement location="$${env.AS_HOME}/lib/javaee.jar"/>
            <pathelement location="$${env.AS_HOME}/lib/webservices-rt.jar"/>
            <pathelement location="$${env.AS_HOME}/lib/activation.jar"/>
         </classpath>
         <jvmarg value="-Dcom
         .sun.xml.ws.transport.http.client.HttpTransportPipe.dump=true"/>
      </java>
   </target>
</project>
Alternatively you can execute
com.sun.xml.ws.transport.http.client.HttpTransportPipe.dump=true;
from your Java program to programatically enable/disable
logging. Since you often run JAX-WS in a container where
setting system properties can be tedious, you might find this
easier.
With this switch enabled, you'll see message dumps like
the following in System.out.
Example 2.21. Sample dump
---[HTTP request]---
SOAPAction:
Content-Type: text/xml
Accept: text/xml, multipart/related, text/html, image/gif, image/jpeg, *; q=.2, */*; q=.2
<?xml version="1.0" ?><S:Envelope xmlns:S="http://schemas.xmlsoap.org/soap/envelope/"><S:Body><addNumbers xmlns="http://duke.example.org"><arg0>10</arg0><arg1>20</arg1></addNumbers></S:Body></S:Envelope>--------------------

---[HTTP response 200]---
Date: Thu, 17 Aug 2006 00:35:42 GMT
Content-type: text/xml
Transfer-encoding: chunked
Server: Apache-Coyote/1.1
null: HTTP/1.1 200 OK

<?xml version="1.0" ?><S:Envelope xmlns:S="http://schemas.xmlsoap.org/soap/envelope/"><S:Body><addNumbersResponse xmlns="http://duke.example.org"><return>30</return></addNumbersResponse></S:Body></S:Envelope>--------------------
A similar property com.sun.xml.ws.transport.local.LocalTransportPipe.dump=true is available for the local transport.
The dump mechanism explained above allows you to get the actual bytes that are sent over the wire, as well as any transport specific information (such as HTTP headers), but the mechanism is different from transports to transports. JAX-WS also defines a transport-agnostic dump, which works regardless of what transport you use.
This dump happens after JAX-WS parses the incoming message into XML infoset. So you will not be able to investigate a well-formedness error with this dump.
To enable such dump, set the system property com.sun.xml.ws.util.pipe.StandaloneTubeAssembler.dump=true or execute that as a Java program.
You can dump incoming HTTP requests and responses to
System.out on the server side by using the system
property com.sun.xml.ws.transport.http.HttpAdapter.dump=true.
This works exactly like above (except that this works on server,
not client.) You can also set this property programatically by
executing com.sun.xml.ws.transport.http.HttpAdapter.dump=true;
as Java progrma.
The transport agnostic dump as explained above also works on the server for incoming messages and responses.
Java SE ships with JAX-WS API and implementation. Unless you are taking precautions, applications that use the JAX-WS API will run with the JAX-WS API version built into Java SE and not a newer version of JAX-WS on the application classpath. Applications that use new functions of the JAX-WS API will therefore fail to run. This section discusses how to work around this issue by using the endorsed standards override mechanism.
Java SE 5 does not include the JAX-WS API at all and does not suffer from the issues discussed in this chapter.
You can upgrade to JAX-WS 2.2 by copying
jaxws-api.jar and jaxb-api.jar into
the JRE endorsed directory, which is
$JRE_HOME/lib/endorsed (or
$JDK_HOME/jre/lib/endorsed). (Both of these JARs
are available in the JAX-WS RI 2.2.x
download.) The directory might not exist yet and in
that case you will have to create it yourself.
Some application containers, such as Glassfish, Tomcat,
modify the location of the endorsed directory to a different
place. From inside the JVM, you can check the current location
by doing
System.out.println(System.getProperty("java.endorsed.dirs"));
Obviously you still need all the other JAX-WS jars in your classpath.
Please do not put all JAX-WS jars into the endorsed
directory. This makes it impossible for JAX-WS RI to see other
classes that it needs for its operation, such as Servlet
classes on the server-side, or Ant classes in the tool time.
As those are not loaded by the bootstrap classloader, you will
get NoClassDefError on Servlet/Ant
classes.
Also consider that by putting the JAX-WS libraries into
$JRE_HOME/lib/endorsed, all applications running
under this Java installation will run with the endorsed JAX-WS
libraries.
Metro ships with the JAX-WS API Java SE contain JAX-WS API, too. Unless you are taking precautions, applications that use the JAX-WS API will run with the JAX-WS API version built into Java SE and not with the JAX-WS API built into Metro on the application classpath. Applications that use new functions of the JAX-WS API or other Metro functionality will therefore fail to run.
Do not install any other JAX-WS or Metro libraries than the ones discussed below into an endorsed directory at the same time, otherwise Metro code may not be able to load classes from the application classpath.
If you are running an application in Tomcat,
make sure you are using the
metro-on-tomcat.xml installation script. They
will copy all files into the Tomcat specific
endorsed directories. Without that step, web applications and
EJBs will not be able to pick up the proper JAX-WS API. In other
words, including the Metro libraries in the WEB-INF/lib of a
web application does not make use of the endorsed mechanism
and the JAX-WS API cannot be used by the web
application.
If you are running an application in GlassFish, Metro is
already included. You may install updates with the
metro-on-glassfish.xml Ant script.
If you want to run an application or Web Service client
outside the Tomcat or GlassFish containers, you have to
install the file webservices-api.jar into the JRE
endorsed directory, $JRE_HOME/lib/endorsed (or
$JDK_HOME/jre/lib/endorsed). The directory might
not exist yet and in that case you will have to create it
yourself.
Alternatively, you can set the Java system property
java.endorsed.dirs to an application specific
directory and copy the files there. See endorsed
standards override mechanism for more details on how to
set an application specific endorsed directory.
You may also use the metro-on-glassfish.xml
or metro-on-tomcat.xml Ant scripts to do the
installation of webservices-api.jar into the JRE endorsed
directory for you. Simply invoke ant -f
metro-on-glassfish.xml install-api. The
install-api target will only install
webservices-api.jar and will not install Metro
into Tomcat or GlassFish. Note that you need to run this
command as a user that has write permissions to the JRE
endorsed directory.
Before you deploy or publish your endpoint, you will need to package your endpoint application into a WAR file. The requirements when building a WAR:
All WSDLs, Schema files should be packaged under WEB-INF/wsdl dir. It is recommended not to package the WSDL if you are doing Java-first development.
WebService implementation class should contain
@WebServiceannotation. Provider based endpoints should have@WebServiceProviderannotation.wsdl, service, port attributes are mandatory for Provider based endpoints and can be specified in
@WebServiceProviderannotation or deployment descriptor (sun-jaxws.xml).Deployment descriptors, web.xml, web services deployment descriptor (sun-jaxws.xml or 109 or spring)
Typically, one creates the WAR file with a GUI development
tool or with the ant war task from the
generated artifacts from wsimport,
wsgen, or apt tools.
For example, a sample WAR file starting from a WSDL file:
Example 2.22. Sample WAR contents (WSDL First)
WEB-INF/classes/hello/HelloIF.class SEI
WEB-INF/classes/hello/HelloImpl.class Endpoint
WEB-INF/sun-jaxws.xml JAX-WS RI deployment descriptor
WEB-INF/web.xml Web deployment descriptor
WEB-INF/wsdl/HelloService.wsdl WSDL
WEB-INF/wsdl/schema.xsd WSDL imports this Schema
Metro defines its own deployment descriptor, which is also known as JAX-WS RI deployment descriptor - sun-jaxws.xml.
Here is the schema for sun-jaxws.xml:
Example 2.23.
<?xml version="1.0" encoding="UTF-8"?>
<!--

    DO NOT ALTER OR REMOVE COPYRIGHT NOTICES OR THIS HEADER.

    Copyright (c) 1997-2012 Oracle and/or its affiliates. All rights reserved.

    The contents of this file are subject to the terms of either the GNU
    General Public License Version 2 only ("GPL") or the Common Development
    and Distribution License("CDDL") (collectively, the "License").  You
    may not use this file except in compliance with the License.  You can
    obtain a copy of the License at
    http://glassfish.java.net/public/CDDL+GPL_1_1.html
    or packager/legal/LICENSE.txt.  See the License for the specific
    language governing permissions and limitations under the License.

    When distributing the software, include this License Header Notice in each
    file and include the License file at packager/legal/LICENSE.txt.

    GPL Classpath Exception:
    Oracle designates this particular file as subject to the "Classpath"
    exception as provided by Oracle in the GPL Version 2 section of the License
    file that accompanied this code.

    Modifications:
    If applicable, add the following below the License Header, with the fields
    enclosed by brackets [] replaced by your own identifying information:
    "Portions Copyright [year] [name of copyright owner]"

    Contributor(s):
    If you wish your version of this file to be governed by only the CDDL or
    only the GPL Version 2, indicate your decision by adding "[Contributor]
    elects to include this software in this distribution under the [CDDL or GPL
    Version 2] license."  If you don't indicate a single choice of license, a
    recipient has the option to distribute your version of this file under
    either the CDDL, the GPL Version 2 or to extend the choice of license to
    its licensees as provided above.  However, if you add GPL Version 2 code
    and therefore, elected the GPL Version 2 license, then the option applies
    only if the new code is made subject to such option by the copyright
    holder.

-->

<xsd:schema
        xmlns:xsd="http://www.w3.org/2001/XMLSchema"
        xmlns:tns="http://java.sun.com/xml/ns/jax-ws/ri/runtime"
        xmlns:javaee="http://java.sun.com/xml/ns/javaee"
        targetNamespace="http://java.sun.com/xml/ns/jax-ws/ri/runtime"
        elementFormDefault="qualified"
        attributeFormDefault="unqualified"
        version="1.0">

    <xsd:import namespace="http://java.sun.com/xml/ns/javaee"
                schemaLocation="http://java.sun.com/xml/ns/javaee/javaee_web_services_metadata_handler_2_0.xsd"/>

    <xsd:element name="endpoints">
        <xsd:complexType>
            <xsd:sequence>
                <xsd:element name="endpoint" type="tns:endpointType" minOccurs="0" maxOccurs="unbounded"/>
            </xsd:sequence>
            <xsd:attribute name="version" type="xsd:string" use="required"/>
        </xsd:complexType>
    </xsd:element>

    <xsd:complexType name="externalMetadata">
        <xsd:attribute name="file" type="xsd:string" use="optional"/>
        <xsd:attribute name="resource" type="xsd:string" use="optional"/>
    </xsd:complexType>

    <xsd:complexType name="endpointType">
        <xsd:annotation>
            <xsd:documentation>
                An endpoint definition has several attributes:
                <ul>
                    <li>name</li>
                    - the endpoint name
                    <li>implementation</li>
                    - the name of the endpoint implementation class
                    <li>wsdl</li>
                    - the name of a resource corresponding to the WSDL document for the endpoint
                    <li>service</li>
                    - the QName of the WSDL service that owns this endpoint;
                    <li>port</li>
                    - the QName of the WSDL port for this endpoint;
                    <li>url-pattern</li>
                    - the URL pattern this endpoint is mapped to.
                    <li>binding</li>
                    - specify binding id for SOAP1.1 or SOAP1.2
                    <li>databinding</li>
                    - specify databinding type - "glassfish.jaxb" for JAX-B RI (default), "eclipselink.jaxb" for Toplink
                    MOXy
                    <li>enable-mtom</li>
                    - Enables MTOM optimization
                </ul>
                <p>
                    <b>wsdl, service, port</b>
                    attributes are required for provider based endpoints
                </p>
                <p>Allowed nested element(s) is
                    <b>external-metadata</b>
                    defining xml descriptor to be used to supplement or override annotation metadata. One element
                    defines one resource/file.
                </p>
            </xsd:documentation>
        </xsd:annotation>

        <xsd:sequence>
            <xsd:element name="external-metadata" type="tns:externalMetadata" minOccurs="0" maxOccurs="unbounded"/>
            <xsd:element ref="javaee:handler-chains" minOccurs="0" maxOccurs="1"/>
        </xsd:sequence>
        <xsd:attribute name="name" type="xsd:string" use="required"/>
        <xsd:attribute name="implementation" type="xsd:string" use="required"/>
        <xsd:attribute name="wsdl" type="xsd:anyURI"/>
        <xsd:attribute name="service" type="xsd:anyURI"/>
        <xsd:attribute name="port" type="xsd:anyURI"/>
        <xsd:attribute name="url-pattern" type="xsd:anyURI" use="required"/>
        <xsd:attribute name="databinding" type="xsd:string"/>
        <xsd:attribute name="binding" type="xsd:string"/>
        <xsd:attribute name="enable-mtom" type="xsd:boolean"/>
    </xsd:complexType>

</xsd:schema>
The <endpoints> element contain one or
more <endpoint> elements. Each endpoint
represents a port in the WSDL and it contains all information
about implementation class, servlet url-pattern, binding, WSDL,
service, port QNames. The following shows a
sun-jaxws.xml file for a simple
HelloWorld service. sun-jaxws.xml is the schema
instance of sun-jaxws.xml.
Example 2.24.
<?xml version="1.0" encoding="UTF-8"?>
<endpoints
        xmlns="http://java.sun.com/xml/ns/jax-ws/ri/runtime"
        version="2.0">
    <endpoint
            name="MyHello"
            implementation="hello.HelloImpl"
            url-pattern="/hello"/>
</endpoints>
Endpoint attribute
Table 2.1. Endpoint attributes
Attribute Optional Use nameN Name of the endpoint wsdlY Primary wsdl file location in the WAR file. E.g. WEB-INF/wsdl/HelloService.wsdl. If this isn't specified, JAX-WS will generate and publish a new WSDL. When the service is developed from Java, it is recommended to omit this attribute. serviceY QName of WSDL service. For e.g. {http://example.org/}HelloService. When the service is developed from java, it is recommended to omit this attribute. portY QName of WSDL port. For e.g. {http://example.org/}HelloPort. When the service is developed from Java, it is recommended to omit this attribute. implementationN Endpoint implementation class name. For e.g: hello.HelloImpl. The class should have @WebServiceannotation. Provider based implementation class should have@WebServiceProviderannotation.url-patternN Should match <url-pattern> in web.xml bindingY Binding id defined in the JAX-WS API. The possible values are: "http://schemas.xmlsoap.org/wsdl/soap/http","http://www.w3.org/2003/05/soap/bindings/HTTP/"If omitted, it is considered SOAP1.1 binding.enable-mtomY Enables MTOM optimization. true or false. Default is false. Specifying Handler Chains
Example 2.25.
<?xml version="1.0" encoding="UTF-8"?>
<endpoints xmlns="http://java.sun.com/xml/ns/jax-ws/ri/runtime"
           version="2.0">
    <endpoint name="MyHello">
        <handler-chains xmlns="http://java.sun.com/xml/ns/javaee">
            <handler-chain>
                <handler>
                    <handler-name>MyHandler</handler-name>
                    <handler-class>hello.MyHandler</handler-class>
                </handler>
            </handler-chain>
        <handler-chains>
    </endpoint>
</endpoints>
External Web Service Metadata
Example 2.26.
If there is a need to use existing implementation for web service and it is impossible to change the source code to provide necessary java annotations, it is possible to use external web service metadata configuration. For more information on this topic see External Web Service Metadata
<?xml encoding="UTF-8" version="1.0" ?>
<endpoints xmlns="http://java.sun.com/xml/ns/jax-ws/ri/runtime" version="2.0">
    <endpoint implementation="org.example.server.BlackboxService" url-pattern="/WS" name="WS">
        <external-metadata resource="external-metadata-org.example.server.BlackboxService.xml" />
    </endpoint>
</endpoints>
The following shows a web.xml file for a simple HelloWorld service. It shows the listener and servlet classes that need to be used when deploying Metro-based web services.
Example 2.27.
<?xml version="1.0" encoding="UTF-8"?>
<!DOCTYPE web-app PUBLIC
        "-//Sun Microsystems, Inc.//DTD Web Application 2.3//EN"
        "http://java.sun.com/j2ee/dtds/web-app_2_3.dtd">

<web-app>
   <listener>
      <listener-class>
         com.sun.xml.ws.transport.http.servlet.WSServletContextListener
      </listener-class>
   </listener>
   <servlet>
      <servlet-name>hello</servlet-name>
      <servlet-class>com.sun.xml.ws.transport.http.servlet.WSServlet
      </servlet-class>
      <load-on-startup>1</load-on-startup>
   </servlet>
   <servlet-mapping>
      <servlet-name>hello</servlet-name>
      <url-pattern>/hello</url-pattern>
   </servlet-mapping>
   <session-config>
      <session-timeout>60</session-timeout>
   </session-config>
</web-app>A little bit about Message Context in JAX-WS :This article explains about the context that is available to Client application, Handlers and Service that can be used to access/propagate additional contextual information.
Introduction to Handlers in JAX-WS: This article introduces to Handler framework in JAX-WS.
Extend your Web Service applications with the new efficient Handlers in JAX-WS RI : Use this RI extension to take advantage of the JAX-WS RI Message API for efficient access to message and other contextual information.
Here are the steps to use the Metro 2.x/JAX-WS implementation instead of Oracle's JAX-WS implementation in Weblogic 12.1.1.0 without affecting the Weblogic domain or other applications under the same domain:
Create an
EARfile and include yourWARfile inside it. Here is the directory structure of theEARfile:META-INF/META-INF/MANIFEST.MFMETA-INF/application.xmlMETA-INF/weblogic-application.xmlmetro-custom-tubes.war(your.warapplication)APP-INF/APP-INF/lib/APP-INF/lib/stax-api.jarAPP-INF/lib/webservices-api.jarAPP-INF/lib/webservices-extra-api.jarAPP-INF/lib/webservices-extra.jarAPP-INF/lib/webservices-rt.jarAPP-INF/lib/webservices-tools.jarAPP-INF/classes/
Include a
META-INF/application.xmlfile to point out the name of theEARfile and the location and context of theWARfile:<?xml version="1.0" encoding="UTF-8"?> <application xmlns:xsi="http://www.w3.org/2001/XMLSchema-instance" xmlns="http://java.sun.com/xml/ns/javaee" xmlns:application="http://java.sun.com/xml/ns/javaee/application_5.xsd" xsi:schemaLocation="http://java.sun.com/xml/ns/javaee http://java.sun.com/xml/ns/javaee/application_5.xsd" id="Application_ID" version="5"> <module> <web> <web-uri>metro-custom-tubes.war</web-uri> <context-root>metro-custom-tubes</context-root> </web> </module> </application>Include a
META-INF/weblogic-application.xmlfile that uses Weblogic's class loading filtering feature to override the System class loader packages and resources with the ones from the application class loader:<?xml version="1.0" encoding="UTF-8"?> <wls:weblogic-application xmlns:xsi="http://www.w3.org/2001/XMLSchema-instance" xmlns:wls="http://www.bea.com/ns/weblogic/weblogic-application" xsi:schemaLocation=" http://www.bea.com/ns/weblogic/weblogic-application http://www.bea.com/ns/weblogic/weblogic-application.xsd http://java.sun.com/xml/ns/j2ee http://java.sun.com/xml/ns/j2ee/j2ee_1_4.xsd"> <wls:application-param> <wls:param-name>webapp.encoding.default</wls:param-name> <wls:param-value>UTF-8</wls:param-value> </wls:application-param> <wls:prefer-application-packages> <wls:package-name>com.ctc.*</wls:package-name> <wls:package-name>com.sun.xml.*</wls:package-name> <wls:package-name>com.sun.istack.*</wls:package-name> <wls:package-name>com.sun.msv.datatype.*</wls:package-name> <wls:package-name>com.sun.msv.driver.*</wls:package-name> <wls:package-name>com.sun.msv.grammar.*</wls:package-name> <wls:package-name>com.sun.msv.reader.*</wls:package-name> <wls:package-name>com.sun.msv.relaxns.*</wls:package-name> <wls:package-name>com.sun.msv.scanner.*</wls:package-name> <wls:package-name>com.sun.msv.util.*</wls:package-name> <wls:package-name>com.sun.msv.verifier.*</wls:package-name> <wls:package-name>com.sun.msv.writer.*</wls:package-name> <wls:package-name>com.sun.org.apache.xml.internal.*</wls:package-name> <wls:package-name>com.sun.wsit.*</wls:package-name> <wls:package-name>javax.jws.*</wls:package-name> <wls:package-name>javax.xml.bind.*</wls:package-name> <wls:package-name>javax.xml.soap.*</wls:package-name> <wls:package-name>javax.xml.stream.*</wls:package-name> <wls:package-name>javax.xml.ws.*</wls:package-name> <wls:package-name>javax.xml.activation.*</wls:package-name> <wls:package-name>javax.xml.annotation.*</wls:package-name> <wls:package-name>javax.xml.mail.*</wls:package-name> <wls:package-name>javax.xml.security.*</wls:package-name> <wls:package-name>javax.xml.registry.*</wls:package-name> <wls:package-name>javax.xml.rpc.*</wls:package-name> <wls:package-name>javax.xml.crypto.*</wls:package-name> <wls:package-name>javanet.staxutils.*</wls:package-name> <wls:package-name>jp.gr.xml.*</wls:package-name> <wls:package-name>org.codehaus.stax2.*</wls:package-name> <wls:package-name>org.glassfish.gmbal.*</wls:package-name> <wls:package-name>org.iso_relax.*</wls:package-name> <wls:package-name>org.jcp.xml.dsig.*</wls:package-name> <wls:package-name>org.jvnet.*</wls:package-name> <wls:package-name>org.relaxng.*</wls:package-name> </wls:prefer-application-packages> <wls:prefer-application-resources> <wls:resource-name>META-INF/services/javax.xml.ws.*</wls:resource-name> <wls:resource-name>META-INF/services/com.sun.xml.ws.*</wls:resource-name> <wls:resource-name>META-INF/services/com.sun.tools.ws.*</wls:resource-name> </wls:prefer-application-resources> </wls:weblogic-application>Make sure the
webservices-*.jarfiles are placed in theAPP-INF/libdirectory.Make sure any Metro classes you are overriding are placed in the
APP-INF/classesdirectory.Here is the directory structure of the
WARfile:META-INF/META-INF/MANIFEST.MFWEB-INF/WEB-INF/web.xmlWEB-INF/sun-jaxws.xmlWEB-INF/weblogic.xmlWEB-INF/metro.xmlWEB-INF/wsdl/WEB-INF/wsdl/AddNumbers.wsdlWEB-INF/classes/WEB-INF/classes/*
Include a
WEB-INF\weblogic.xmlfile with theprefer-web-inf-classesentry to override the System class loader classes with the ones in theWEB-INF\libdirectory:<?xml version="1.0" encoding="UTF-8"?> <weblogic-web-app xmlns="http://www.bea.com/ns/weblogic/90"> <container-descriptor> <prefer-web-inf-classes>true</prefer-web-inf-classes> </container-descriptor> </weblogic-web-app>
Make sure your
web.xmlfile does not include the<display-name>and<description>elements under<servlet>element because they are not supported in the following 2.4 or 2.5 Web Deployment Descriptor XSDs:Weblogic will throw this schema validation error if they are present:
Message icon - Error VALIDATION PROBLEMS WERE FOUND problem:
cvc-complex-type.2.4a: Expected elements
'servlet-class@http://java.sun.com/xml/ns/javaee
jsp-file@http://java.sun.com/xml/ns/javaee' instead of
'display-name@http://java.sun.com/xml/ns/javaee' here in element
servlet@http://java.sun.com/xml/ns/javaee:<null> problem: cvc-complex-type.2.4a:
Expected elements 'servlet-class@http://java.sun.com/xml/ns/javaee
jsp-file@http://java.sun.com/xml/ns/javaee' instead of
'description@http://java.sun.com/xml/ns/javaee' here in element
servlet@http://java.sun.com/xml/ns/javaee:<null>
Make sure any Oneway methods / operations in your service implementation class have the
@Onewayannotation in order to avoid thisNullPointerException:com.sun.xml.ws.transport.http.servlet.WSServletContextListener contextInitialized SEVERE: WSSERVLET11: failed to parse runtime descriptor: java.lang.NullPointerException java.lang.NullPointerException at com.sun.xml.ws.model.JavaMethodImpl.freeze(JavaMethodImpl.java:375) at com.sun.xml.ws.model.AbstractSEIModelImpl.freeze(AbstractSEIModelImplIf you're getting an exception similar to the following one, extract the contents of the file MemberSubmissionEndpointReference.zip into the
APP-INF/classesdirectory in theEAR(subclassesMemberSubmissionEndpointReference.AddressandMemberSubmissionEndpointReference.Elementshave been annotated with@XmlType(name="elements", namespace=MemberSubmissionEndpointReference.MSNS)and@XmlType(name="address", namespace=MemberSubmissionEndpointReference.MSNS)respectively and recompiled). Make sure to preserve the hierarchy of the file (all classes from the file should be located in the directoryAPP-INF/classes/com/sun/xml/ws/developer/).com.sun.xml.ws.transport.http.servlet.WSServletDelegate doGet SEVERE: caught throwable java.lang.ExceptionInInitializerError at com.sun.xml.ws.api.addressing.WSEndpointReference.toSpec(WSEndpointReference.java:637) at com.sun.xml.ws.rx.rm.runtime.ServerTube.handleCreateSequenceAction(ServerTube.java:334) at com.sun.xml.ws.rx.rm.runtime.ServerTube.processProtocolMessage(ServerTube.java:302) at com.sun.xml.ws.rx.rm.runtime.ServerTube.processRequest(ServerTube.java:169) at com.sun.xml.ws.api.pipe.Fiber.__doRun(Fiber.java:641) at com.sun.xml.ws.api.pipe.Fiber._doRun(Fiber.java:600) at com.sun.xml.ws.api.pipe.Fiber.doRun(Fiber.java:585) at com.sun.xml.ws.api.pipe.Fiber.runSync(Fiber.java:482) at com.sun.xml.ws.server.WSEndpointImpl$2.process(WSEndpointImpl.java:314) at com.sun.xml.ws.transport.http.HttpAdapter$HttpToolkit.handle(HttpAdapter.java:608) at com.sun.xml.ws.transport.http.HttpAdapter.handle(HttpAdapter.java:259) at com.sun.xml.ws.transport.http.servlet.ServletAdapter.invokeAsync(ServletAdapter.java:213) at com.sun.xml.ws.transport.http.servlet.WSServletDelegate.doGet(WSServletDelegate.java:159) at com.sun.xml.ws.transport.http.servlet.WSServletDelegate.doPost(WSServletDelegate.java:194) at com.sun.xml.ws.transport.http.servlet.WSServlet.doPost(WSServlet.java:80) at javax.servlet.http.HttpServlet.service(HttpServlet.java:751) at javax.servlet.http.HttpServlet.service(HttpServlet.java:844) at weblogic.servlet.internal.StubSecurityHelper$ServletServiceAction.run(StubSecurityHelper.java:242) at weblogic.servlet.internal.StubSecurityHelper$ServletServiceAction.run(StubSecurityHelper.java:216) at weblogic.servlet.internal.StubSecurityHelper.invokeServlet(StubSecurityHelper.java:132) at weblogic.servlet.internal.ServletStubImpl.execute(ServletStubImpl.java:352) at weblogic.servlet.internal.ServletStubImpl.execute(ServletStubImpl.java:235) at weblogic.servlet.internal.WebAppServletContext$ServletInvocationAction.wrapRun(WebAppServletContext.java:3284) at weblogic.servlet.internal.WebAppServletContext$ServletInvocationAction.run(WebAppServletContext.java:3254) at weblogic.security.acl.internal.AuthenticatedSubject.doAs(AuthenticatedSubject.java:321) at weblogic.security.service.SecurityManager.runAs(SecurityManager.java:120) at weblogic.servlet.provider.WlsSubjectHandle.run(WlsSubjectHandle.java:57) at weblogic.servlet.internal.WebAppServletContext.doSecuredExecute(WebAppServletContext.java:2163) at weblogic.servlet.internal.WebAppServletContext.securedExecute(WebAppServletContext.java:2089) at weblogic.servlet.internal.WebAppServletContext.execute(WebAppServletContext.java:2074) at weblogic.servlet.internal.ServletRequestImpl.run(ServletRequestImpl.java:1512) at weblogic.servlet.provider.ContainerSupportProviderImpl$WlsRequestExecutor.run(ContainerSupportProviderImpl.java:254) at weblogic.work.ExecuteThread.execute(ExecuteThread.java:256) at weblogic.work.ExecuteThread.run(ExecuteThread.java:221) Caused by: javax.xml.ws.WebServiceException: Error creating JAXBContext for W3CEndpointReference. at com.sun.xml.ws.spi.ProviderImpl$2.run(ProviderImpl.java:266) at com.sun.xml.ws.spi.ProviderImpl$2.run(ProviderImpl.java:262) at java.security.AccessController.doPrivileged(Native Method) at com.sun.xml.ws.spi.ProviderImpl.getEPRJaxbContext(ProviderImpl.java:261) at com.sun.xml.ws.spi.ProviderImpl.<clinit>(ProviderImpl.java:95) ... 34 more Caused by: com.sun.xml.bind.v2.runtime.IllegalAnnotationsException: 2 counts of IllegalAnnotationExceptions Two classes have the same XML type name "address". Use @XmlType.name and @XmlType.namespace to assign different names to them. this problem is related to the following location: at com.sun.xml.ws.developer.MemberSubmissionEndpointReference$Address at public com.sun.xml.ws.developer.MemberSubmissionEndpointReference$Address com.sun.xml.ws.developer.MemberSubmissionEndpointReference.address at com.sun.xml.ws.developer.MemberSubmissionEndpointReference this problem is related to the following location: at javax.xml.ws.wsaddressing.W3CEndpointReference$Address at private javax.xml.ws.wsaddressing.W3CEndpointReference$Address javax.xml.ws.wsaddressing.W3CEndpointReference.address at javax.xml.ws.wsaddressing.W3CEndpointReference Two classes have the same XML type name "elements". Use @XmlType.name and @XmlType.namespace to assign different names to them. this problem is related to the following location: at com.sun.xml.ws.developer.MemberSubmissionEndpointReference$Elements at public com.sun.xml.ws.developer.MemberSubmissionEndpointReference$Elements com.sun.xml.ws.developer.MemberSubmissionEndpointReference.referenceProperties at com.sun.xml.ws.developer.MemberSubmissionEndpointReference this problem is related to the following location: at javax.xml.ws.wsaddressing.W3CEndpointReference$Elements at private javax.xml.ws.wsaddressing.W3CEndpointReference$Elements javax.xml.ws.wsaddressing.W3CEndpointReference.referenceParameters at javax.xml.ws.wsaddressing.W3CEndpointReference at com.sun.xml.bind.v2.runtime.IllegalAnnotationsException$Builder.check(IllegalAnnotationsException.java:106) at com.sun.xml.bind.v2.runtime.JAXBContextImpl.getTypeInfoSet(JAXBContextImpl.java:466) at com.sun.xml.bind.v2.runtime.JAXBContextImpl.<init>(JAXBContextImpl.java:298) at com.sun.xml.bind.v2.runtime.JAXBContextImpl.<init>(JAXBContextImpl.java:141) at com.sun.xml.bind.v2.runtime.JAXBContextImpl$JAXBContextBuilder.build(JAXBContextImpl.java:1157) at com.sun.xml.bind.v2.ContextFactory.createContext(ContextFactory.java:145) at sun.reflect.NativeMethodAccessorImpl.invoke0(Native Method) at sun.reflect.NativeMethodAccessorImpl.invoke(NativeMethodAccessorImpl.java:57) at sun.reflect.DelegatingMethodAccessorImpl.invoke(DelegatingMethodAccessorImpl.java:43) at java.lang.reflect.Method.invoke(Method.java:601) at javax.xml.bind.ContextFinder.newInstance(ContextFinder.java:263) at javax.xml.bind.ContextFinder.newInstance(ContextFinder.java:250) at javax.xml.bind.ContextFinder.find(ContextFinder.java:447) at javax.xml.bind.JAXBContext.newInstance(JAXBContext.java:652) at javax.xml.bind.JAXBContext.newInstance(JAXBContext.java:599) at com.sun.xml.ws.spi.ProviderImpl$2.run(ProviderImpl.java:264) ... 38 more
In the JAX-WS programming model, to develop a web services client you compile the deployed WSDL using wsimport and then at runtime the same WSDL is used to determine binding information. The default WSDL used can be determined by looking in the javax.xml.ws.Service subclass generated by wsimport. You can choose another location (network or local file directory) for the WSDL other than the one you used wsimport with, for example if you do not want runtime accesses of the WSDL to go over the network or if you want to edit a copy of the WSDL to work around some bug (dangerous but we do it sometimes).
There are the different ways in which you can provide the local WSDL information to the JAX-WS runtime:
Example 2.28. Sample service creation using local WSDL
URL baseUrl = client.MtomService.class.getResource(".");
URL url = new URL(baseUrl, "../Soap11MtomUtf8.svc.xml");
MtomService service = new MtomService(url, new QName("http://tempuri.org/", "MtomService"));
IMtomTest proxy = service.getBasicHttpBindingIMtomTest();
String input="Hello World";
byte[] response = proxy.echoStringAsBinary(input);Create a catalog file
META-INF/jax-ws-catalog.xml
Example 2.29. jax-ws-catalog.xml
<catalog xmlns="urn:oasis:names:tc:entity:xmlns:xml:catalog" prefer="system">
    <system systemId="http://131.107.72.15/MTOM_Service_Indigo/Soap11MtomUtf8.svc?wsdl"
            uri="Soap11MtomUtf8.svc.xml"/>
</catalog>
For details see the details on using catalog scheme
This works well but requires some work, such as composing the right catalog file then package it appropriately.
There is another easy way to do it - just run wsimport with -wsdlLocation switch and provide the WSDL location value which is relative to the generated Service class and provide the WSDL location value which is relative to the generated Service class and you need to put this WSDL file at this relative location.
Let us try to create a client for the NET 3.0 MTOM endpoint. I am using Metro 1.0.
First I save the .NET 3.0 MTOM WSDL locally then run wsimport giving the relative location to where you will package the wsdl with your application
Example 2.30. Sample wsimport command
wsimport -keep -d build/classes -p client etc/Soap11MtomUtf8.svc.xml -wsdlLocation ../Soap11MtomUtf8.svc.xml
Note
Why is the relative location is ../Soap11MtomUtf8.svc.xml? Basically the generated Service will be at build/classes/client location and I would copy this WSDL at build/classes, see option -d and -p.
Here is excerpt from the generated MtomService class. You can see how the wsdlLocation value is generated inside it and is used internally to create the Service.
Example 2.31. MtomService.java
/**
 * This class was generated by the JAX-WS RI.
 * JAX-WS RI 2.1.2-hudson-53-SNAPSHOT
 * Generated source version: 2.1
 */
@WebServiceClient(name = "MtomService",
        targetNamespace = "http://tempuri.org/",
        "../Soap11MtomUtf8.svc.xml")
public class MtomService extends Service {

    private final static URL MTOMSERVICE_WSDL_LOCATION;
    private final static Logger logger = Logger.getLogger(client
            .MtomService.class.getName());

    static {
        URLurl = null;
        try {
            URLbaseUrl;

            baseUrl = client.MtomService.class.getResource(".");
            url = new URL(baseUrl, "../Soap11MtomUtf8.svc.xml");
        } catch (MalformedURLException e) {
            logger.warning("Failed to create URL for the wsdl Location: ." +
                    "./Soap11MtomUtf8.svc.xml");
            logger.warning(e.getMessage());
        }
        MTOMSERVICE_WSDL_LOCATION = url;
    }

    public MtomService() {
        super(MTOMSERVICE_WSDL_LOCATION,
                new QName("http://tempuri.org/", "MtomService"));
    }

    ...
See Client.java below it invokes the .NET 3.0
service. You may notice here that you dont need to enable MTOM
explicitly. Metro bring in .NET 3.0 interop thru WSIT and due to
this the MTOM policy assertions in the .NET 3.0 WSDL, it correctly
interpreted and the IMtomTest port is configured with MTOM
enabled.
Example 2.32. MtomService.java
package client;

import com.sun.xml.ws.transport.http.client.HttpTransportPipe;

/**
 * Client that invokes .NET 3.0 MTOM endpoint using a local wsdl
 */
public class Client {

    public static void main(String[] args) {

        //enble SOAP Message logging
        HttpTransportPipe.dump = true;

        //Create IMtomTest proxy to invoke .NET 3.0 MTOM service
        IMtomTest proxy = new MtomService().getBasicHttpBindingIMtomTest();
        String input = "Hello World";
        byte[] response = proxy.echoStringAsBinary(input);
        System.out.println("Sent: " + input + ", Received: " + new String
                (response));
    }
}
Get the complete client bundle from here
and see the enclosed Readme.txt for instructions on
how to run it.
Often times there is need to override the endpoint address that is obtained from the WSDL referenced by the generated Service class. This is how you can do this:
You can use
BindingProvider.ENDPOINT_ADDRESS_PROPERTY to set the
endpoint address in your client application code.
Example 2.33. Sample
//Create service and proxy from the generated Service class.
HelloService service = new HelloService();
HelloPort proxy = service.getHelloPort();

((BindingProvider) proxy).getRequestContext().put(BindingProvider
        .ENDPOINT_ADDRESS_PROPERTY, "http://new/endpointaddress");

proxy.sayHello("Hello World!"); In case you have access to the updated WSDL which has the
right endpoint address, you can simply create the Service using
this WSDL and there will be no need to set the
BindingProvider.ENDPOINT_ADDRESS property.
Note
This updated WSDL must have the same wsdl:service and wsdl:port as in the original wsdl. Otherwise you may get an error while creating the Service or Port.
Example 2.34. Sample
//Create service and proxy from the generated Service class.
HelloService service = new HelloService(serviceName,
        "http://new/endpointaddress?wsdl");
HelloPort proxy = service.getHelloPort();

proxy.sayHello("Hello World!");These articles provide details on maintaing state with JAX-WS Web Services.
The Fast Infoset specification (ITU-T Rec. X.891 | ISO/IEC 24824-1) describes an open, standards-based "binary XML" format that is based on theXML Information Set. Metro supports this optimized encoding JAX-WS implementation. For ease of deployment, JAX-WS also support a form of HTTP content negotiation that can be used to turn on Fast Infoset during message exchanges. By default, the Fast Infoset encoding is turned off. For more information on how to use this feature see the following section.
The XML Information Set specifies the result of parsing an XML document, referred to as an XML infoset (or simply an infoset), and a glossary of terms to identify infoset components, referred to as information items and properties. An XML infoset is an abstract model of the information stored in an XML document; it establishes a separation between data and information in a way that suits most common uses of XML. In fact, several of the concrete XML data models are defined by referring to XML infoset items and their properties. For example, SOAP Version 1.2 makes use of this abstraction to define the information in a SOAP message without ever referring to XML 1.X, and the SOAP HTTP binding specifically allows for alternative media types that "provide for at least the transfer of the SOAP XML Infoset".
The Fast Infoset specification is jointly standardized at the ITU-T and ISO. The specification is available to all ITU-T sector members and can also be obtained via the corresponding ISO national body in your location. These specifications recommend the use of the MIME type application/fastinfoset, which has been approved by the Internet Engineering Steering Group (IESG) for documents serialized using this format.
FI is an open-source project initiated by Sun Microsystems to provide access to a fast, fully-featured and robust implementation of the Fast Infoset specification. Metro employs the basic Fast Infoset parsers and serializers available from that project.
Content negotiation is completely driven by the client and
uses the standard HTTP headers Accept and
Content-Type. The initial request is always encoded
in XML, but the client has the option of including the MIME type
application/fastinfoset as part of the HTTP Accept header list. If
the request is received by a Fast Infoset-enabled service, the
reply will be encoded in Fast Infoset. The remainder of the
conversation between the client and the service will also be
encoded in Fast Infoset as long as the client continues to use the
same client object (e.g., the same stub instance) to converse with
the server. We call this form of negotiation pessimistic, in
contrast to the optimistic case in which a client directly
initiates a message exchange using the more efficient
encoding.
Content negotiation can be enabled in two different ways:
(i) by setting a system property on the VM used to run the client,
and (ii) by setting a property on the proxy object. In either
case, both the property name and its value are identical. For
JAX-WS, the name of the property is
com.sun.xml.ws.client.ContentNegotiation. In either
case, the accepted property values are none (the default) and
pessimistic, optimistic. Note that due to JDK repackaging, if you
are using JAX-WS implementation directly from JDK you need to use this
property name: com.sun.xml.internal.ws.client.ContentNegotiation.
Example 2.35. Enabling FastInfoset by configuring proxy
// Enabling FI in pessimistic mode
Map<String, Object> ctxt = ((BindingProvider)proxy).getRequestContext();
ctxt.put("com.sun.xml.ws.client.ContentNegotiation", "pessimistic");
java -Dcom.sun.xml.ws.client.ContentNegotiation=pessimistic ...
Starting with the Metro 2.1 release Metro officially supports deployment in clustered environment configurations including the support for stateful Metro features, namely Reliable Messaging (see High Availability Support in Reliable Messaging for limitations), Secure Conversation, Security NONCE Manager and Stateful Web Services. Currently this support is tested with and limited to the GlassFish Application Server.
Clustering support in Metro is automatic, which means that once
configured and enabled in the container, there is no extra
configuration required on the Metro side to enable Metro High
Availability support. The GlassFish Metro Glue Module
that is responsible for Metro - GlassFish integration does all the
necessary configuration automatically during the Metro module
initialization by injecting the required configuration information
into the Metro runtime using a private API contract.
For more information on configuring Clustering environment in GlassFish, please consult the GlassFish Application Server User Guide or watch this very comprehensible basic screencast or another a more recent screen cast available at The GlassFish YouTube Channel.