Table of Contents
This project allows you to deploy a JAX-WS endpoint as a Spring Service Bean. We won't repeat the information that is on the site already and instead focus on how to get more out of the Spring integration in the following sections.
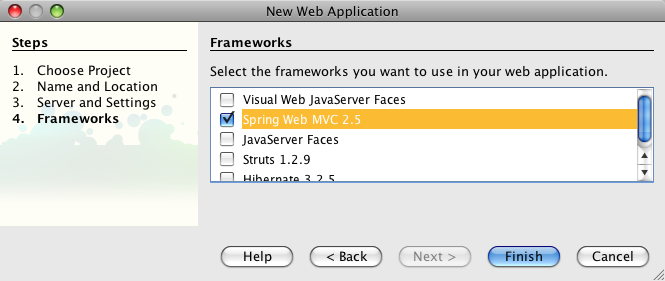
NetBeans provides Spring support out of the box. You just need to make sure you have the NetBeans plugins installed (Spring Framework Library, Spring Beans and Spring Web MVC). The following section explains how to create a JAX-WS endpoint with a Spring Web MVC application. The instructions assume NetBeans 6.1 but should work with NetBeans 6.0 as well.
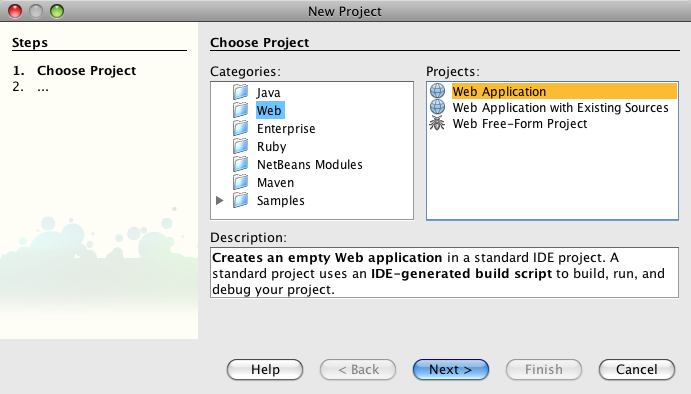
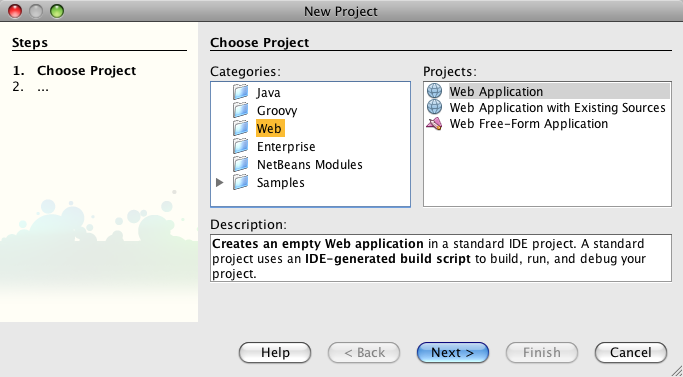
The Spring Web MVC support built into NetBeans is fully integrated into the IDE. That means in order to create a NetBeans project that integrates Spring, all we need to do is create an ordinary Web Application:
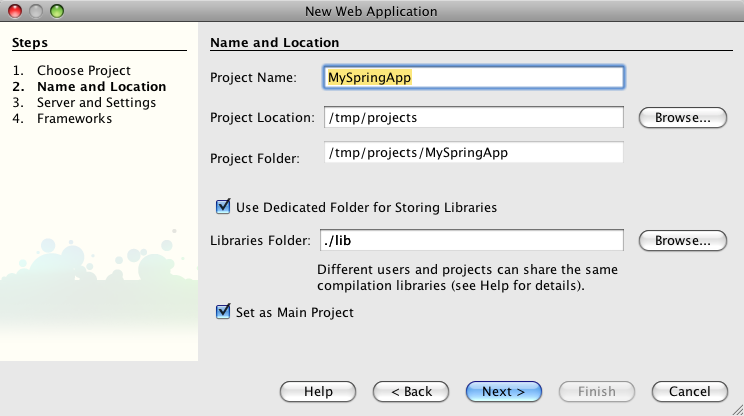
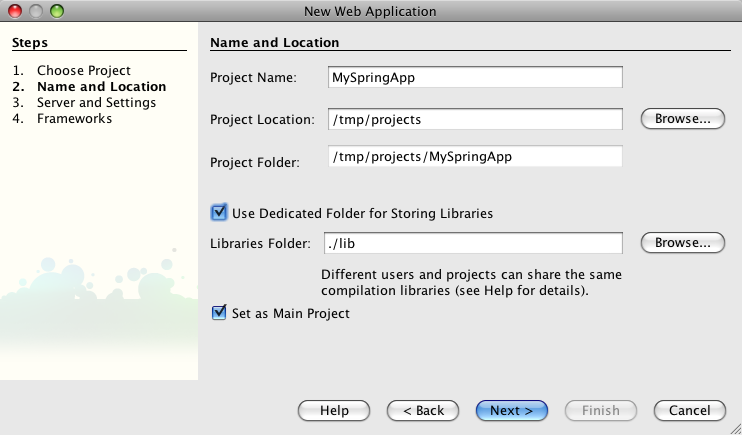
We are choosing the "Use Dedicated Folder for Storing Libraries" option in the next step because we need to add a few libraries later:
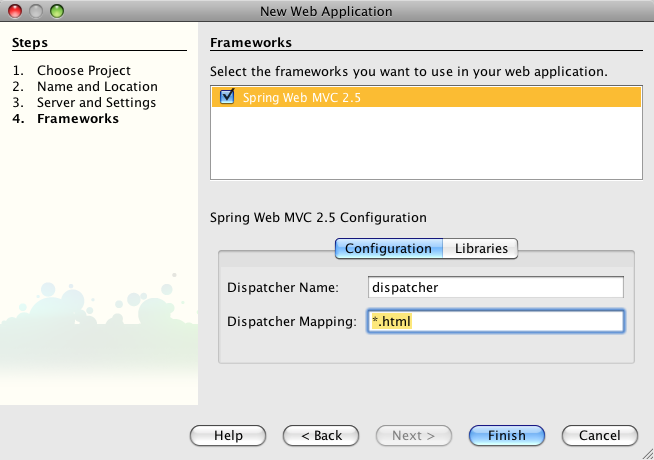
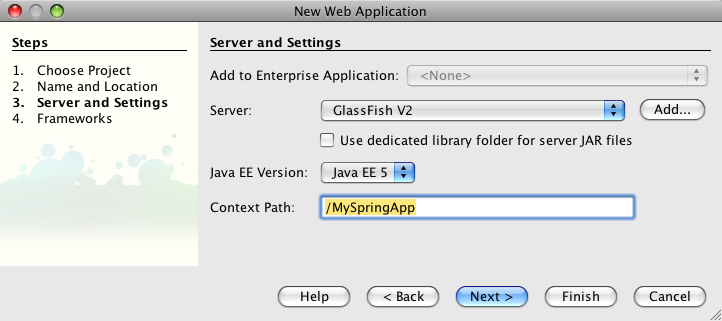
In the third screen, I am sticking with the defaults. Finally, in the last step, we get to choose the Spring Web MVC framework:
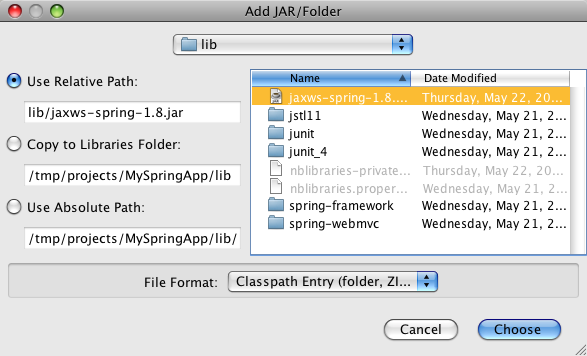
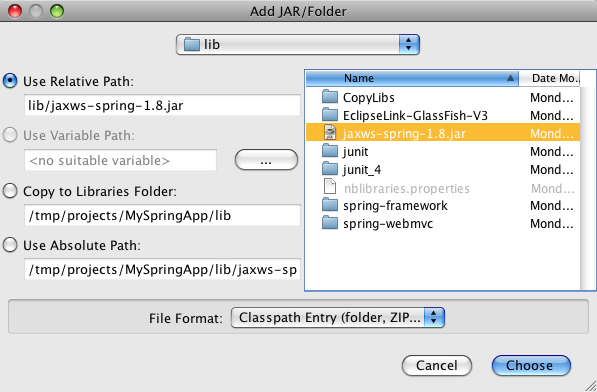
Now we still need to add the JAX-WS Spring library to the project. You can download the library from http://maven2-repository.java.net/source/browse/maven2-repository/trunk/www/repository/org/jvnet/jax-ws-commons/spring/jaxws-spring/. Then move the library (in my case jaxws-spring-1.8.jar) into the lib directory of the NetBeans project. Next, right-click on the project in the NetBeans navigator and select Properties. In the Properties dialog, select the Libraries category and press the Add JAR/Folder button. Here you can select the library and add it to the project.
The JAX-WS Spring library has a dependency on XBean. That means we need an additional library. I downloaded this version. Remember to add this library to the project as well.
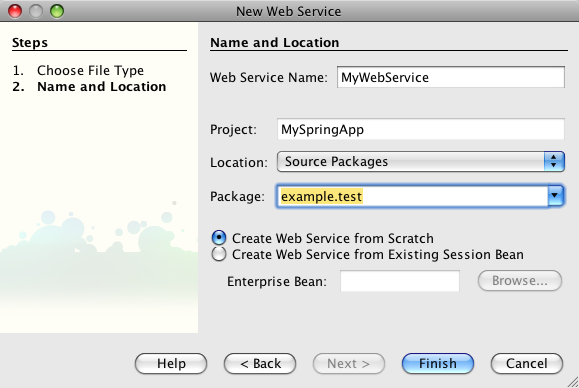
Now that we created a web application project in the previous section, we can add a JAX-WS Web Service. Simply right-click on the MySpringApp project that we created previously and select New -> Web Service... We get a dialog where you must enter the name of the Web Service class and the Java package name:
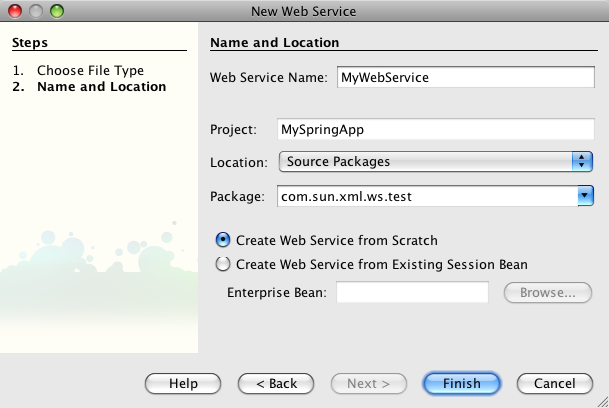
All that NetBeans really does when you create the Web Service is generate a skeleton class with the WebService annotation. You can now add methods to that class etc.
At this point we could actually package and deploy our application to GlassFish and we would get a working Web Service because GlassFish recognizes the WebService annotation and automatically instantiates the Web Service. However, we want to use Spring of course, so we need to go through a few additional steps to instantiate the Web Service as a Spring Bean.
NetBeans already created basic web.xml and applicationContext.xml files. My web.xml file looks like this:
Example 21.1.
<?xml version="1.0" encoding="UTF-8"?>
<web-app version="2.5" xmlns="http://java.sun.com/xml/ns/javaee"
         xmlns:xsi="http://www.w3.org/2001/XMLSchema-instance"
         xsi:schemaLocation="http://java.sun.com/xml/ns/javaee
         http://java.sun.com/xml/ns/javaee/web-app_2_5.xsd">
   <context-param>
      <param-name>contextConfigLocation</param-name>
      <param-value>/WEB-INF/applicationContext.xml</param-value>
   </context-param>
   <listener>
      <listener-class>
         org.springframework.web.context.ContextLoaderListener
      </listener-class>
   </listener>
   <servlet>
      <servlet-name>dispatcher</servlet-name>
      <servlet-class>org.springframework.web.servlet.DispatcherServlet
      </servlet-class>
      <load-on-startup>2</load-on-startup>
   </servlet>
   <servlet-mapping>
      <servlet-name>dispatcher</servlet-name>
      <url-pattern>*.html</url-pattern>
   </servlet-mapping>
   <session-config>
      <session-timeout>
         30
      </session-timeout>
   </session-config>
   <welcome-file-list>
      <welcome-file>redirect.jsp</welcome-file>
   </welcome-file-list>
</web-app>
All that needs to be added to the web.xml is the following:
Example 21.2.
<servlet>
    <servlet-name>jaxws-servlet</servlet-name>
    <servlet-class>
        com.sun.xml.ws.transport.http.servlet.WSSpringServlet
    </servlet-class>
</servlet>
<servlet-mapping>
    <servlet-name>jaxws-servlet</servlet-name>
    <url-pattern>/ws</url-pattern>
</servlet-mapping>
The WSSpringServlet plugs JAX-WS into Spring. The
servlet-mapping is mapping the servlet to the subpath /ws.
The applicationContext.xml that was created by NetBeans looks like this:
Example 21.3.
<?xml version="1.0" encoding="UTF-8"?>
<beans xmlns="http://www.springframework.org/schema/beans"
       xmlns:xsi="http://www.w3.org/2001/XMLSchema-instance"
       xmlns:p="http://www.springframework.org/schema/p"
       xmlns:aop="http://www.springframework.org/schema/aop"
       xmlns:tx="http://www.springframework.org/schema/tx"
       xsi:schemaLocation="http://www.springframework.org/schema/beans
       http://www.springframework.org/schema/beans/spring-beans-2.5.xsd
       http://www.springframework.org/schema/aop
       http://www.springframework.org/schema/aop/spring-aop-2.5.xsd
       http://www.springframework.org/schema/tx
       http://www.springframework.org/schema/tx/spring-tx-2.5.xsd">

   <bean id="propertyConfigurer"
class="org.springframework.beans.factory.config.PropertyPlaceholderConfigurer"
         p:location="/WEB-INF/jdbc.properties"/>

   <bean id="dataSource"
         class="org.springframework.jdbc.datasource.DriverManagerDataSource"
         p:driverClassName="${jdbc.driverClassName}"
         p:url="${jdbc.url}"
         p:username="${jdbc.username}"
         p:password="${jdbc.password}"/>

   <!-- ADD PERSISTENCE SUPPORT HERE (jpa, hibernate, etc) -->

</beans>
To enable the Web Service implementation it is
sufficient to add the following to the applicationContext.xml:
Example 21.4.
<wss:binding url="/ws">
    <wss:service>
        <ws:service bean="#webService"/>
    </wss:service>
</wss:binding>

<!-- this bean implements web service methods -->
<bean id="webService"
      class="com.sun.xml.ws.test.MyWebService"/>
The above binds the Web Service Bean to the /ws
subpath that we defined in the web.xml and it defines the actual
implementation class (the one that has the WebService annotation).
We need to add a couple of namespace declarations to the
applicationContext.xml as well. The final product should look like
this:
Example 21.5.
<?xml version="1.0" encoding="UTF-8"?>
<beans xmlns="http://www.springframework.org/schema/beans"
       xmlns:xsi="http://www.w3.org/2001/XMLSchema-instance"
       xmlns:p="http://www.springframework.org/schema/p"
       xmlns:aop="http://www.springframework.org/schema/aop"
       xmlns:tx="http://www.springframework.org/schema/tx"
       xmlns:ws="http://jax-ws.java.net/spring/core"
       xmlns:wss="http://jax-ws.java.net/spring/servlet"
       xsi:schemaLocation="http://www.springframework.org/schema/beans
       http://www.springframework.org/schema/beans/spring-beans-2.5.xsd
       http://www.springframework.org/schema/aop
       http://www.springframework.org/schema/aop/spring-aop-2.5.xsd
       http://www.springframework.org/schema/tx
       http://www.springframework.org/schema/tx/spring-tx-2.5.xsd
       http://jax-ws.java.net/spring/core
       http://jax-ws.java.net/spring/core.xsd
       http://jax-ws.java.net/spring/servlet
       http://jax-ws.java.net/spring/servlet.xsd">

   <bean id="propertyConfigurer"
class="org.springframework.beans.factory.config.PropertyPlaceholderConfigurer"
         p:location="/WEB-INF/jdbc.properties"/>

   <bean id="dataSource"
         class="org.springframework.jdbc.datasource.DriverManagerDataSource"
         p:driverClassName="${jdbc.driverClassName}"
         p:url="${jdbc.url}"
         p:username="${jdbc.username}"
         p:password="${jdbc.password}"/>

   <!-- ADD PERSISTENCE SUPPORT HERE (jpa, hibernate, etc) -->

   <wss:binding url="/ws">
      <wss:service>
         <ws:service bean="#webService"/>
      </wss:service>
   </wss:binding>

   <!-- this bean implements web service methods -->
   <bean id="webService" class="com.sun.xml.ws.test.MyWebService"/>
</beans>>
If you built and deployed your web application to GlassFish, you should be able to see a human-readable entry page if you point your browser at http://localhost:8080/MySpringApp/ws. You can find more details on how to configure JAX-WS for Spring here.
If you downloaded NetBeans with the Web & Java EE pack it already comes equipped with everything you need to develop Spring web applications. Otherwise make sure that you have the NetBeans plugins installed (Spring Framework Library, Spring Beans and Spring Web MVC). The following section explains how to create a JAX-WS endpoint with a Spring Web MVC application. The instructions assume NetBeans 6.5. See Using Metro With Spring and NetBeans 6.1 for instructions for NetBeans 6.1.
The Spring Web MVC support built into NetBeans is fully integrated into the IDE. That means in order to create a NetBeans project that integrates Spring, all we need to do is create an ordinary Web Application:
We are choosing the "Use Dedicated Folder for Storing Libraries" option in the next step because we need to add a few libraries later:
In the third screen, you may stick with the defaults:
Finally, in the last step, you get to choose the Spring Web MVC framework:
Now you still need to add the JAX-WS Spring library to the project. You can download the library from http://maven2-repository.java.net/source/browse/maven2-repository/trunk/www/repository/org/jvnet/jax-ws-commons/spring/jaxws-spring/. Then move the library (i.e. jaxws-spring-1.8.jar) into the lib directory of the NetBeans project. Next, right-click on the project in the NetBeans navigator and select Properties. In the Properties dialog, select the Libraries category and press the Add JAR/Folder button. Here you can select the library and add it to the project.
The JAX-WS Spring library has a dependency on XBean. That means you need an additional library. You can download this version. Remember to add this library to the project as well.
Now that you created a web application project in the previous section, you can add a JAX-WS Web Service. Simply right-click on the MySpringApp project that you created previously and select New -> Web Service... You get a dialog where you must enter the name of the Web Service class and the Java package name:
All that NetBeans really does when you create the Web Service is generate a skeleton class with the WebService annotation. You can now add methods to that class etc.
After you added an operation to the web service you could actually package and deploy our application to GlassFish and you would get a working Web Service because GlassFish recognizes the WebService annotation and automatically instantiates the Web Service. However, since this is a Spring tutorial, you need to go through a few additional steps to instantiate the Web Service as a Spring Bean.
NetBeans already created basic web.xml and applicationContext.xml files. The web.xml ought to look like this:
Example 21.6.
<?xml version="1.0" encoding="UTF-8"?>
<web-app version="2.5" xmlns="http://java.sun.com/xml/ns/javaee"
         xmlns:xsi="http://www.w3.org/2001/XMLSchema-instance"
         xsi:schemaLocation="http://java.sun.com/xml/ns/javaee
         http://java.sun.com/xml/ns/javaee/web-app_2_5.xsd">
   <context-param>
      <param-name>contextConfigLocation</param-name>
      <param-value>/WEB-INF/applicationContext.xml</param-value>
   </context-param>
   <listener>
      <listener-class>
         org.springframework.web.context.ContextLoaderListener
      </listener-class>
   </listener>
   <servlet>
      <servlet-name>dispatcher</servlet-name>
      <servlet-class>org.springframework.web.servlet.DispatcherServlet
      </servlet-class>
      <load-on-startup>2</load-on-startup>
   </servlet>
   <servlet-mapping>
      <servlet-name>dispatcher</servlet-name>
      <url-pattern>*.htm</url-pattern>
   </servlet-mapping>
   <session-config>
      <session-timeout>
         30
      </session-timeout>
   </session-config>
   <welcome-file-list>
      <welcome-file>redirect.jsp</welcome-file>
   </welcome-file-list>
</web-app>
All that needs to be added to the web.xml is the following:
Example 21.7.
<servlet>
    <servlet-name>jaxws-servlet</servlet-name>
    <servlet-class>
       com.sun.xml.ws.transport.http.servlet.WSSpringServlet
    </servlet-class>
</servlet>
<servlet-mapping>
    <servlet-name>jaxws-servlet</servlet-name>
    <url-pattern>/ws</url-pattern>
</servlet-mapping>
The WSSpringServlet plugs JAX-WS into Spring. The
servlet-mapping is mapping the servlet to the subpath /ws.
The applicationContext.xml that was created by NetBeans looks like this:
Example 21.8.
<?xml version="1.0" encoding="UTF-8"?>
<beans xmlns="http://www.springframework.org/schema/beans"
       xmlns:xsi="http://www.w3.org/2001/XMLSchema-instance"
       xmlns:p="http://www.springframework.org/schema/p"
       xmlns:aop="http://www.springframework.org/schema/aop"
       xmlns:tx="http://www.springframework.org/schema/tx"
       xsi:schemaLocation="http://www.springframework.org/schema/beans
       http://www.springframework.org/schema/beans/spring-beans-2.5.xsd
       http://www.springframework.org/schema/aop
       http://www.springframework.org/schema/aop/spring-aop-2.5.xsd
       http://www.springframework.org/schema/tx
       http://www.springframework.org/schema/tx/spring-tx-2.5.xsd">

   <bean id="propertyConfigurer"
class="org.springframework.beans.factory.config.PropertyPlaceholderConfigurer"
         p:location="/WEB-INF/jdbc.properties"/>

   <bean id="dataSource"
         class="org.springframework.jdbc.datasource.DriverManagerDataSource"
         p:driverClassName="${jdbc.driverClassName}"
         p:url="${jdbc.url}"
         p:username="${jdbc.username}"
         p:password="${jdbc.password}"/>

   <!-- ADD PERSISTENCE SUPPORT HERE (jpa, hibernate, etc) -->

</beans>
To enable the Web Service implementation it is
sufficient to add the following to the applicationContext.xml:
Example 21.9.
<wss:binding url="/ws">
    <wss:service>
        <ws:service bean="#webService"/>
    </wss:service>
</wss:binding>

<!-- this bean implements web service methods -->
<bean id="webService" class="example.test.MyWebService"/>
The above binds the Web Service Bean to the /ws
subpath that we defined in the web.xml and it defines the actual
implementation class (the one that has the WebService annotation).
You need to add a couple of namespace declarations to the
applicationContext.xml as well. The final product should look like
this:
Example 21.10.
<?xml version="1.0" encoding="UTF-8"?>
<beans xmlns="http://www.springframework.org/schema/beans"
       xmlns:xsi="http://www.w3.org/2001/XMLSchema-instance"
       xmlns:p="http://www.springframework.org/schema/p"
       xmlns:aop="http://www.springframework.org/schema/aop"
       xmlns:tx="http://www.springframework.org/schema/tx"
       xmlns:ws="http://jax-ws.java.net/spring/core"
       xmlns:wss="http://jax-ws.java.net/spring/servlet"
       xsi:schemaLocation="http://www.springframework.org/schema/beans
       http://www.springframework.org/schema/beans/spring-beans-2.5.xsd
       http://www.springframework.org/schema/aop
       http://www.springframework.org/schema/aop/spring-aop-2.5.xsd
       http://www.springframework.org/schema/tx
       http://www.springframework.org/schema/tx/spring-tx-2.5.xsd
       http://jax-ws.java.net/spring/core
       http://jax-ws.java.net/spring/core.xsd
       http://jax-ws.java.net/spring/servlet
       http://jax-ws.java.net/spring/servlet.xsd">

   <bean id="propertyConfigurer"
class="org.springframework.beans.factory.config.PropertyPlaceholderConfigurer"
         p:location="/WEB-INF/jdbc.properties"/>

   <bean id="dataSource"
         class="org.springframework.jdbc.datasource.DriverManagerDataSource"
         p:driverClassName="${jdbc.driverClassName}"
         p:url="${jdbc.url}"
         p:username="${jdbc.username}"
         p:password="${jdbc.password}"/>

   <!-- ADD PERSISTENCE SUPPORT HERE (jpa, hibernate, etc) -->

   <wss:binding url="/ws">
      <wss:service>
         <ws:service bean="#webService"/>
      </wss:service>
   </wss:binding>

   <!-- this bean implements web service methods -->
   <bean id="webService" class="example.test.MyWebService"/>

</beans>
If you built and deployed your web application to GlassFish, you should be able to see a human-readable entry page if you point your browser at http://localhost:8080/MySpringApp/ws. You can find more details on how to configure JAX-WS for Spring here.
This section builds on Using Metro With Spring and NetBeans 6.1 or Using Metro With Spring and NetBeans 6.5 because the WSIT functionality is easiest to configure with NetBeans. But you should be able to apply the instructions when you are not using NetBeans as well.
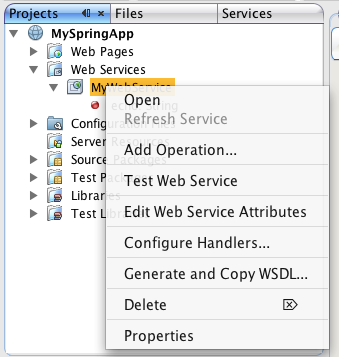
We assume that you already have a working web application with a Web Service that you can deploy to Spring. If you followed the instructions on how to set up a NetBeans project, you can now select the Web Service in the Projects navigator under the Web Services node. All you need to do then is right-click on the Web Service and select Edit Web Service Attributes from the pop-up window:
See these chapters for guidance on the configuration options:
Once you have configured everything, you would simply build and deploy your application and Metro will pick up the configuration that was generated. If you need to create the configuration manually, create a file named wsit-package.service.xml and put it into the WEB-INF directory of your application. package.service needs to be replaced by the fully qualified name of the class that has the WebService annotation. If your class is named e.g. org.example.MyWebService, the file would need to be named wsit-org.example.MyWebService. For more detailed instructions, see WSIT Example Using a Web Container Without NetBeans IDE.